

All in One View
Content from Introduction
Last updated on 2026-04-28 | Edit this page
Overview
Questions
- How do we provide information to users of our research software?
- Why is documenting code useful for researchers?
- When should we start writing documentation for our code?
Objectives
- Describe at least three benefits of documenting research software
- Explain when in the project lifecycle documentation should begin
- Identify the kinds of documentation this module will cover
What is research software documentation?
Research software comes in many forms, such as:
- data processing workflows with multiple steps;
- a library of functions used within a research team for a particular kind of analysis;
- tools designed to collect raw data in the field.
Code is rarely self-explanatory. It is a tool we design and extend over time, often alongside colleagues. To explain how our code works we write software documentation.
Documentation provides information about our programs for everyone involved in their development, use, and future reuse. It can take the form of written text, tips embedded in a computer environment, or diagrams that guide the user through a (potentially complex) software tool. Good documentation explains both how the software works and why it behaves the way it does.
Why document our code?
We have all encountered software — whether written by ourselves, a colleague, or a stranger — that is hard to use because it is unclear what it does or how it works. Reading the source code may not help; sometimes it seems that only the original author can use it. And sometimes that author is you, six months ago, with no memory of what you were thinking at the time.
Advantages of good documentation
There are many advantages to writing guidance alongside your research software. Documentation helps you and others to use the code successfully in the future, and it ensures that the value of your work is sustained.
Research outputs often depend upon the code used to generate them, so clarity and confidence are essential when that code performs calculations, simulations, or data analysis. Clear context and instructions make research processes and analysis pipelines more reproducible.
There are also benefits to making your code more readable. Well-written software is easier to maintain and has greater sustainability, meaning it can continue to be used and modified for longer despite changes in technology. Reusable software encourages others to apply it to their own research, increasing its visibility and research impact.
Challenge
Think of a time you picked up unfamiliar research code — your own from months ago, or someone else’s.
- What made it easy or hard to use?
- What documentation was available, and what was missing?
- If you had written that code, what documentation would have helped future users most?
In the long run, writing documentation also helps you to develop your own software engineering practice. It builds the habit of reflecting on the purpose of the software and articulating what each component or module is for.
A well-documented, reusable software package can take on a life of its own, with benefits extending beyond yourself to your collaborators and other researchers in the future.
High-quality documentation is a key part of a healthy software lifecycle. It can make the difference between an abandoned piece of code (sometimes called gradware, code a former student wrote that nobody else can use) and a successful long-term software project with lasting impact.
When should I write documentation?
Now! Start writing and sharing documentation for your research code from the beginning of your project. A first draft does not need to be perfect: anything is more useful than nothing.
The best practice for modern, collaborative research is to document your processes early and often. Notes about your code help other people read and use it, and they clarify your own thinking as you design the system, focussing your work on the important parts of the task at hand.
This might include any of the kinds of software documentation we will discuss in this module, such as:
- design notes and diagrams;
- a step-by-step tutorial for beginners;
- code comments.
Documentation should also be a consideration in your software management plan, a concept covered in Module 1a on Software Lifecycle Planning. And it is never too late to start documenting an older code project.
Keep in touch with other developers and users of the research code, and note their feedback. Recurring questions and problems often signal areas that need to be covered more clearly or in greater depth. Incorporate this feedback into your documentation as the project evolves.
Research software papers
Some researchers choose to publish a description of their code as a software paper in an academic journal, a kind of methods paper that improves the transparency and replicability of computational results.
This is beyond the scope of this module. The FAIR² programme covers it separately in the Publishing software papers module. See the FAIR² course page for details and registration.
- Reproducibility: Well-documented software is easier for other researchers to understand and use with confidence, enabling them to reproduce your results, validate findings, and build trust in your research outputs.
- Collaboration: Clear instructions enable other researchers to use and collaborate with your software and research projects.
- Knowledge transfer: Your software will be easier to maintain in the long term if others can learn about it and take it on after the original developers move on.
- Sustainability: Readable, documented code is easier to maintain and reuse, extending the useful life of your software.
Content from Documentation examples
Last updated on 2026-04-28 | Edit this page
Overview
Questions
- What does well-documented code look like?
Objectives
- Be introduced to good software documentation practices
Code examples
In this episode we’ll review some examples of research software and evaluate how readable and reusable it is. The examples are deliberately small and illustrative: the same documentation principles apply to any research code, whether you’re working with text and corpora, qualitative coding, survey data, clinical records, or quantitative measurements.
Example of no documentation
Here is some code intended to process a piece of text. What does this code do? It’s not clear what the code is for or why it was written.
Challenge
Read and evaluate this code.
- What is the purpose of this function?
- What do the variables mean?
- Would you rely on this code in your research? Why, or why not?
The function name doesn’t explain what the code does, and there are
no comments or notes to clarify the author’s intent. The variable names
don’t help either: what does x represent? Where would we
look to find out more about weird_num? It’s effectively a
“magic” number, stated arbitrarily and left unexplained. The logic of
the expression is equally cryptic.
In fact a closer read shows the code can’t even run as written:
sep and skipped are referenced but never
defined. Without documentation, mistakes like that are easy to overlook
until something breaks.
Well-documented example
Now let’s look at an example of best practices in documenting research software. (These snippets come from the end product of this course, so don’t worry if they don’t make sense yet.)
Read and evaluate this code.
- Can you tell what the purpose of the function is?
- What is the meaning of the variables?
- Which code would you prefer to use?
This time, the function name is a verb that describes what the code
does. A clear description spells out the purpose for the reader, and
comment lines (starting with #) explain how the calculation
works. Each variable has a descriptive, human-readable name, and
built-in language features handle the splitting of the text, so a reader
can look up split() or strsplit() elsewhere
rather than puzzling over a bespoke implementation.
The result is code that is much easier to interpret, maintain, and modify in the future.
Some of the syntax in this example may be unfamiliar—that’s fine. We’ll cover the basics as the course progresses.
Real-world examples
Let’s review real-world examples of the documentation for software packages that are used in research. The two examples below come from the quantitative-sciences mainstream, but the same documentation patterns turn up in tools used right across the disciplines—for example text-analysis libraries such as spaCy or quanteda, and many qualitative-data and digital-humanities packages.
NumPy user guide
NumPy is a mathematical package for Python, widely used for quantitative computing and linear algebra. The NumPy User Guide is a thorough website, organised into sections that cover different aspects of the package.
It includes a beginner’s guide, tutorials for common use cases, and in-depth write-ups of specific technical details. Some content assumes no prior knowledge; other parts serve as a reference for readers with a background in mathematics or programming.
If we want to read more about how to use a certain feature, there are
documentation pages such as numpy.array
that describe purpose and the parameters of each function. If we’re in a
Python interpreter shell, we can use the help()
in-built function to view the documentation:
PYTHON
Help on built-in function array in module numpy:
array(...)
array(object, dtype=None, *, copy=True, order='K', subok=False, ndmin=0,
like=None)
Create an array.
Parameters
----------
object : array_like
An array, any object exposing the array interface, an object whose
``__array__`` method returns an array, or any (nested) sequence.
If object is a scalar, a 0-dimensional array containing object is
returned.
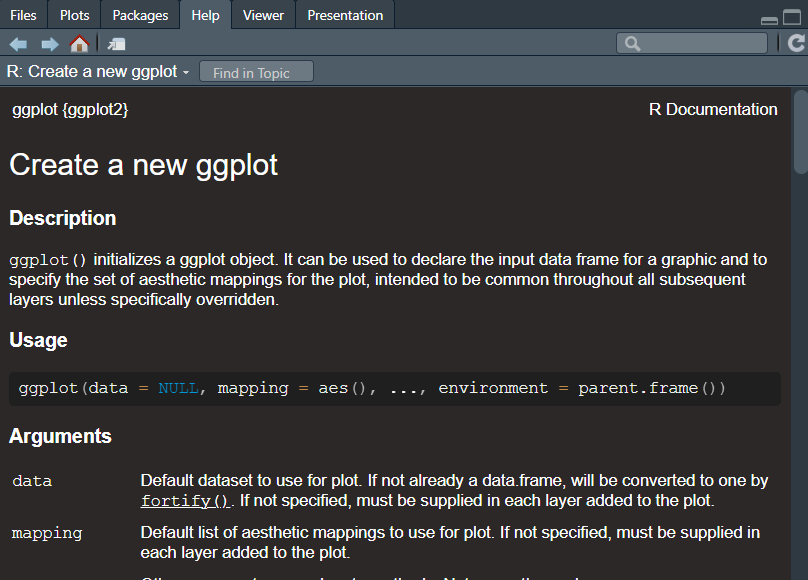
...ggplot2 documentation site
ggplot2 is a package for the R statistical language that produces data visualisations and graphics. The ggplot2 documentation has a simple, accessible layout that walks a new user through installing the package and getting up and running. It also provides a “cheat sheet”: a reference guide that lists commonly used commands in an attractive two-page layout. The documentation is moderate in scope and links out to further resources, such as online courses hosted elsewhere.
In R, we can view the documentation for each function by using the
? syntax. For example, calling
?ggplot2::ggplot will show the help text for that function
or load the reference information in a web browser. Also, if we ever
needed to read it, the source code is neatly organised into R code files
in the repository. For example, the function ggplot()
includes an extensive description of the purpose and operation of that
code, including a list of the parameters and examples of how to use
it.
R
install.packages("ggplot2")
library(ggplot2)
?ggplot2::ggplot
Content from Writing README files
Last updated on 2026-04-29 | Edit this page
Overview
Questions
- How do we introduce our software to new researchers and developers?
- How do I structure the basic notes for my research code?
- What are the contents of good documentation?
Objectives
- Explain why and how to write a README file for research software
- Learn how to structure documentation into sections
- Understand the important components of a good README
What is a README file?
A README file is the first thing a user sees when they find your software. It should give them an approachable overview of the package, define what’s possible to achieve with this code, and get them started on the right track to use the software effectively for their research.
A README contains a brief introduction to the code and shows them how to get started using it. For larger packages, the README forms a concise beginner guide and might link to a more detailed user guide that is located elsewhere.
The tradition of including a “Read Me” file originated with computer programming in the 1970s and, particularly with the rise of open source software, has become a de facto standard in code documentation.
The term “Read Me” recalls the potion that Alice finds in Alice in Wonderland by Lewis Carroll. In Chapter 1, Alice found a bottle labelled “Drink Me” and thinks to herself:
It was all very well to say “Drink me,” but the wise little Alice was not going to do that in a hurry. “No, I’ll look first,” she said, “and see whether it’s marked ‘poison’ or not”; for she had read several nice little histories about children who had got burnt, and eaten up by wild beasts and other unpleasant things, all because they would not remember the simple rules their friends had taught them: such as, that a red-hot poker will burn you if you hold it too long; and that if you cut your finger very deeply with a knife, it usually bleeds; and she had never forgotten that, if you drink much from a bottle marked “poison,” it is almost certain to disagree with you, sooner or later.
It is wise to follow’s Alice’s advice and check the “Read Me” before risking being eaten by wild beasts or other hazards of working with poorly documented research software.
The audience for a README file is the end user, such as a researcher. It’s important to consider the person will read your documentation, and to see things from their point of view. It may be someone who is unfamiliar with certain technical terms, or a researcher will less experience of advanced computing. A suitable approach is to imagine writing a manual for a new user who has never seen this software before.
How to write a README
To start writing a README file, the simplest way is to create
an empty text file called README.txt and start
writing. This file should be located in the directory that contains your
software project.
Challenge
Let’s create a new code project. Create a new, empty directory to contain your work. Then, start writing your README!
Follow these general steps to create a README file. The specific details for each operating system are detailed below.
- Create a directory to contain your project. We call this the root directory;
- In that directory, create a new text file;
- Name the file
README.txt; - Open the file for editing—start writing your documentation!
README contents
The essentials contents of a README document are:
- The name of the software. This seems trivial, but a clear title and description of a piece of software will be essential for others to identify your software and differentiate it from others.
- A brief introduction to your code, including links to relevant websites.
- Contact details for the authors and maintainers.
- A clear statement of who the target audience is for the software package.
- Installation instructions or a link to further information published elsewhere.
- Usage instructions, ideally including a “quick start” guide with a few simple examples to get people up and running with your software package.
It can be useful to signpost to related useful methods and software tools by providing links and explaining how other software is related or different to this project when it comes to addressing these kinds of research problems.
You might also describe the contents of your project by giving an overview of the purpose of each file and directory. This is called a manifest.
Walk a mile in the user’s shoes
Put yourself in the position of a researcher who has encountered your software for the first time. Imagine that you had to start from square one, how would you like the code to be introduced to you?
Consider your field of research and the technologies you commonly use.
- What things are obvious to you that may not be clear to others?
- What assumed knowledge must you explain to new colleagues to get them up to speed?
For research code, it’s often important to explain the context in which the software was written and the theory behind it. For example, many researchers write analysis packages or workflows that are based on previously-published research, statistical methods, or theoretical models for which citations can be provided. By including references to research papers we better help the users to understand the methods that are implemented by our software, which enables its users to properly cite their sources and increases the users’ confidence that you have applied those methods correctly.
Installation instructions
Good READMEs provide instructions for getting and setting up your research software. This guidance should be laid out in simple, clear language and organised in a step-by-step manner.
Consider a research project you’ve worked on. Discuss the technical prerequisites for that software, tool, or system. What would someone need to do, when starting from a blank slate, to recreate that environment?
Think about:
- What hardware and software did you need?
- What drivers and libraries were required?
- What software setup, calibration, and configuration is required?
Installing prerequisites
Most research code has several dependencies, which are other software packages that are required for that tool to work. The user will often need to install the programming language onto their computer, such as R, MATLAB, or Python. It’s useful to link to the download pages and provide a link to the package manager tools that are commonly used in those ecosystems. This might also include listing any prerequisites such as hardware or software that must be installed first, such as device drivers.
In software development, a library is a collection of resources that can be used to help build a new tool. This might include other people’s code that is used to achieve commons tasks, such as displaying output or communicating over the internet.
Consider how the installation method might differ for users of other common operating systems, such as Windows, Linux, and Mac OS.
User guide
All software should include some short guidance on how to use it and what the main options and features are. This might be a “quick start” guide with simple examples of common use-cases, or a walkthrough that uses a sample data set.
Explain how the software can be configured or customised, including examples of commonly-used options. If the software integrates with other tools or uses specific file formats for its input and output, it’s useful to explain this here too. It’s a good idea to include links to further references if available.
Many users will benefit from a frequently asked questions (FAQs) or troubleshooting notes, which describes common error messages, explains why they occur, and suggests ways to resolve them.
Writing style
The writing style should be concise, jargon-free, consistent, and pitched at the appropriate level to the intended target audience. All technical terms and acronyms should be explained. However, don’t reinvent the wheel by defining all the terms used, instead link to a reliable external source or journal article.
For more information about the broad topic of improving your writing style, please review these style guides.
Diagrams can be particularly useful to explain complex concepts and workflows. Screenshots may also provide a “show and tell” demonstration of how the software will work. Consider recording a screen-cast of someone setting up and using the software. This can be particularly beneficial for visual learners.
Discuss with the group:
- Reflecting on your past experiences, what software or systems have you used that included excellent diagrams and illustrations to help you learn to use them as a new user?
- Have you ever watched a tutorial video online that explained a software tool or process? What did you like and dislike about the walkthrough?
Not all READMEs must follow this structure. Always adapt the format of your documentation to suit the specific needs of your audience.
Accessibility
Accessibility means reducing barriers to use of your research software. There should be no avoidable blockers for participation in the development community for those experiencing a disability or other social factors. When writing documentation for your code, consider how you can adapt your writing style and present information in a way that means that everyone can interact with it by expending the same amount of time and energy, regardless of their relative abilities.
While this is a broad topic, some general tips to consider when authoring software documentation in a research context are:
- Global audience: Explain ideas in a way that can be understood by people anywhere in the world, regardless of background. Be sensitive to cultural differences and avoid offensive language;
- Inclusivity: Avoid biased language and value diversity e.g. when writing examples;
- Navigation: Ensure that the documentation is compatible with assistive technologies like screen readers and keyboard navigation.
For more information on this topic, please see the following resources:
- Alistair Duggin, What we mean when we talk about accessibility defines the core concepts of accessibility.
- Google developer documentation style guide, Write accessible documentation provides helpful examples.
- Write the Docs, Accessibility guidelines: for writing and beyond lists many useful materials.
Text formatting
Using a file format that allows you to format text and create headers makes the content more comprehensible for the reader. Organising a document into sections or chapters makes it easier to navigate and find the relevant information.
In the software world, Markdown documents are a commonly-used file format for writing READMEs. Markdown is a simple markup language that lets us apply semantic labelling such as emphasis and structure to our text. These are displayed using visual styles that make your documentation more aesthetically pleasing and more navigable. It allows you to format your text using symbols to represent headers, bold text, bullet lists, etc. These are displayed to the user using their screen or other device, depending upon accessibility requirements.
A markup language is a system of special characters that are used to decorate or format pieces of plain text. The syntax normally consists of symbols or tags that are used to encode text, that implies meaning to make it more information-rich. It can be used to structure a documented into sections to provide logical organisation so that it’s easier to navigate.
Typically, a markup language is edited in a similar way to a computer programming language, and is rendered into a document with various rich text formatting such as headers, bold face fonts, etc.
Challenge
Convert your README file to Markdown format to enable more formatting options.
Follow these steps to rename README.txt to
README.md.
An example README file in Markdown format is shown below, in a file
called README.md where “.md” suffix is the filename
extension for Markdown files.
Section headers
You can separate your document into hierarchical
sections with headings using the # symbol. This
makes your README easier to navigate. For example:
MARKDOWN
# Birdsong identification tool

This user guide provides instructions on how to use this birdsong
identifier. The software is designed to assist users in
identifying bird species based on their vocalisations.

# Installation

To install this software, follow the steps below...

# Usage

To use this package, start by configuring...
The hash # symbol means that line will be converted into
a header and displayed to the reader in a large, bold font. This makes
it easier for the reader to find the part of your text they’re looking
for, just like having chapters in a book.
Challenge
Create suitable headers in your document.
How would you organise your document by dividing up the text into subsections by adding further subheadings?
We can create the commonly-used headers used in READMEs by using the Markdown syntax shown below
MARKDOWN
# Title

Brief introduction to the tool...

# Installation

To get started...

# Usage

To use this tool...
This gives some basic structure to the document, which we’ll flesh out later.
We can further subdivide the content by using header levels,
where each subheading uses an additional # symbol. For
example, # is a top-level heading, ## is a
section header, ### is a subsection header, etc.
MARKDOWN
# Title

Brief introduction to the tool...

# Installation

To get started...

## Prerequisites
...

## Drivers
...

# Usage

To use this tool...

## Quick start
...

## Examples
...
These subheadings help the users to navigate the document.
Viewing Markdown documents
There are several ways to view the formatted Markdown document, where the syntax is rendered into a rich text document.
- Many code editors have an in-built Markdown viewer.
- Markdown Live Preview is a web-based tool. Input your Markdown syntax in the left panel and the result will be displayed on the right-hand side.
- In Google Colab, the Text cells use Markdown syntax for formatting.
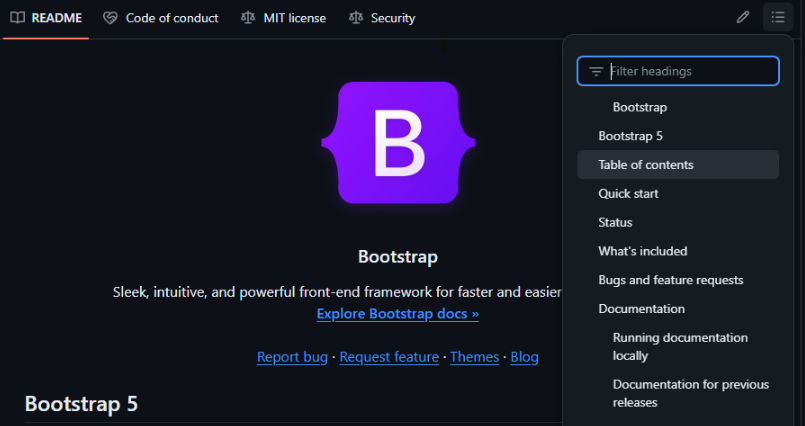
If your code is published on GitHub, the home page of your code repository will display the README file, including a table of contents that is automatically created to easily select the section of the document to view.
Text formatting
Here are some commonly-used text formatting options that can be used with Markdown syntax:
| Meaning | Example | Syntax |
|---|---|---|
| Strong text | Eastern towhee | **Eastern towhee** |
| Emphasised text | Pipilo erythrophthalmus | *Pipilo erythrophthalmus* |
| Code block | name = "Pipilo erythrophthalmus" |
`name = "Pipilo erythrophthalmus"` |
| Hyperlink | Eastern towhee | [Eastern towhee](https://w.wiki/DHi2) |
These may be used to add emphasis to parts of the text or highlight key words and phrases. Using text formatting makes your software documentation easier to skim-read, so researchers can quickly find the part of the text that’s relevant for what they’re working on.
Challenge
Identify several key words in your README file. Apply the “strong text” syntax so they will be displayed using a bold font face or be given increased stress by a screen-reader.
The Markdown syntax for bold font is to wrap the text in two
asterisks **. This may be applied to single words or to
phrases.
For example, we can strongly emphasise a single word:
Identify a bird based on the sound of its call.
Or emphasise a phrase:
Identify a bird based on the sound of its call.
Block quotes
We can create a citation with appealing formatting by using the blockquote syntax in Markdown, which is similar to the method used in email.
MARKDOWN
> The eastern towhee (Pipilo erythrophthalmus) is a large New World
> sparrow. The taxonomy of the towhees has been under debate in
> recent decades, and formerly this bird and the spotted towhee
> were considered a single species, the rufous-sided towhee.
This will be rendered with the following apperearance:
The eastern towhee (Pipilo erythrophthalmus) is a large New World sparrow. The taxonomy of the towhees has been under debate in recent decades, and formerly this bird and the spotted towhee were considered a single species, the rufous-sided towhee.
(This text was retrieved from the Wikipedia page on the Eastern towhee bird.)
Code blocks
If you’d like to present the user with examples of source code, use
code
fences to display the code in a special text box with syntax
highlighting. To do this, wrap the code in three backticks
`. For example:
If you include the name of a programming language then the syntax will be highlighted appropriately, for example:
This makes your code examples easier to read.
Markdown
You can learn more about writing documents using Markdown at Markdown Guide, a reference for using this syntax.
Conclusion
Remember, the README file is a first impression that research users will receive for your software. A README contains a brief description of the software, installation instructions, and a usage guide. Make them informative and user-friendly to enhance the research experience for others and foster collaboration. The writing style should be concise, clear, and explain technical terms. Use diagrams and screenshots for clarity.
- A README file serves as an introduction to your software, guiding users on installation, usage, and understanding its capabilities.
- Consider the user’s technical background; write clearly and avoid jargon.
- Markdown is a recommended format for creating headers, bold text, bullet points, etc.
Further resources
For more information about writing basic software documentation, please review the following materials:
- Raphael Pierzina Hi, my name is README!
- Kira Oakley The Art of README
- Aleksandra Pawlik Five top tips on documentation
- Wikipedia README
Content from Documentation strings
Last updated on 2026-04-29 | Edit this page
Overview
Questions
- How do we describe our code?
- How can we annotate functions in our research code?
- Why are documentation strings useful for research software?
Objectives
- Understand the purpose of documentation strings
- Learn how to write documentation strings that will be useful for other researchers
- Introduce ways to describe the parameters and return values of functions
How do we describe our code?
Describing functions
If you’re publishing a research software package, one of the most common ways that its users will learn to interact with the code is by reading the documentation for each individual function. We learned about functions in an earlier module on software design principles. Functions help us to break our code into smaller units that have a single purpose.
By documenting those functions effectively, we aim to explain their purpose to future users and maintainers of that code. We also need to describe all the expected inputs and outputs of the functions.
Throughout this episode we’ll build up a small piece of fictional
research software called OddSong, a birdsong identifier
that classifies bird species from audio recordings. The code lives in a
file called oddsong.py (or R/identify.R for
the R version) which we will reuse in the next episode on documentation sites.
Documentation strings
We describe functions by using a feature of many programming languages called documentation strings, which is sometimes abbreviated to “docstring”. A documentation string is a piece of text that describes a part of your code and helps other people to use it effectively.
To make a docstring, we write special comments in our code using syntax which is specific to each programming language, although the principle is the same.
Whenever you add functionality to a code project, consider wrapping it up into a function. It may help to write the docstring first to help work through what the purpose of your new code is before you start!
Challenge
Write a documentation string for a function. Create a script called
oddsong and define a function named identify()
that will be used to identify bird songs by inspecting an audio file to
provide the name of that species.
Viewing docstrings
We can view documentation strings for a function by using the
? operator or help() function in R and the help
built-in function in Python.
Challenge
Use the help() function to view the documentation string
for a function.
Let’s view the help text for an in-built function
abs() that finds the absolute value of a number.
The most important thing to include in a docstring is an explanation of the purpose of this piece of code. To write a useful docstring, put yourself in the shoes of someone who encounters your code for the first time. They need a simple introduction that doesn’t assume too much implied knowledge. The explanation may seem obvious to you, but it may help a new user greatly.
How can we tailor our documentation strings to different audiences, such as new users and experienced developers?
Arguments
Next, we must describe the inputs to the function, its arguments or parameters.
We list the input parameters in the code examples below. Each argument has a name and a brief description.
We have added an “arguments” (abbreviated to “args”) section to our docstring which lists the input parameters of the function and describes each one.
Challenge
Add a description of each argument to a function in your code.
Run help() and evaluate the output.
Return values
Finally, we describe the output of the function. The return
value is defined by the return statement in our
function code block.
This will help the user to understand what the function does and what they can expect to receive back when they call it.
It can also be useful to explain any potential errors or exceptions that the function will raise if the inputs aren’t as expected, and how to deal with them.
Challenge
Describe the return value of a function in a documentation string.
Run help() and evaluate the output.
Usage examples
We can also include demonstrations of how to use our code by providing code snippets. To do this, we write a collection of sample code that demonstrate how to use functions effectively in different scenarios.
To do this, let’s add an examples section to our documentation string.
Challenge
Write a brief code example within the documentation string in a function in your code.
We can use the code examples inside docstrings to define test cases that are used in automatic software testing.
Best practices
This section contains some tips for writing useful documentation strings.
Prioritisation
Focus on the purpose and functionality of the code, rather than getting bogged down in the details of how it works. Explain what the function does, rather then the specific implementation, because this might change over time. A function encapsulates an isolated part of a system, which can be used as a black box by other parts of the system or the end user, who in many cases only needs to understand its inputs and outputs.
Tips:
- It’s a good idea to start your docstring with a high-level summary of the function.
- If the function is a major one, include a simple introduction for the new user.
Clarity is key
Be concise. Describe the essential information that user needs to know first and be brief but clear.
As with any software documentation, avoid jargon where possible.
Read the following documentation string, which is very wordy:
PYTHON
def count_calls(morning, evening):
    """
    Counts the total bird calls from two recording sessions, which are the morning and evening arguments
    of this function.

    This function takes two numbers as input and returns their sum.
    The addition is performed using the built-in `+` operator.

    Args:
        morning: The first number to add to the second number, evening.
        evening: The second number to add to the first number, morning.

    Returns:
        The sum of morning and evening, which are summed using the addition operator.
    """
    return morning + evening
Discuss how can we effectively convey the purpose and functionality of a function in a docstring, without going into excessive detail about its implementation?
Don’t reinvent the wheel. Provide links to further resources for users to take a deep dive into more complicated topics.
How can we link to external resources that can provide more in-depth information?
Be consistent. Decide a style of docstring and use that everywhere across your software project. If you’re working on a larger project with multiple developers, refer to the coding conventions and, if in doubt, follow the style of existing code.
There are several different standards for documentation strings. A standard is a convention that determines how the docstrings will be organised and the syntax that is used to represent the arguments, data types, etc.
A list of documentation string standards in Python:
- The PEP 257 docstring standard was designed by the maintainers of the Python programming language.
- The Google Style Guide sets out a docstring format.
- Sphinx docstring format, which has a NumpyDoc extension designed for scientific use.
It doesn’t matter which one you select, as long as it’s used consistently across a project and it’s clear what the syntax means. Some standards are better-supported by other tools such as IDEs and documentation generators.
Automatically generate docstrings
Generative large language model (LLM) services such as Google Gemini can read your code and write docstrings automatically, to a certain extent.
To do this, ask the system to create a docstring and copy your code into the prompt text box. Below is an example prompt and the reply generated by the Google Gemini algorithm:
BASH
Please generate a docstring for this Python function:

def calculate_call_rate(call_count, duration_minutes):
    rate = call_count / duration_minutes
    return rate
The result is the following docstring, in addition to some helpful descriptions of the content that it generated.
PYTHON
def calculate_call_rate(call_count, duration_minutes):
  """
  This function calculates the rate of bird calls per minute in a recording.

  Args:
      call_count (int): The number of bird calls observed in the recording. Must be a non-negative number.
      duration_minutes (float): The length of the recording in minutes. Must be a positive number.

  Returns:
      float: The rate of bird calls per minute.
  """

  # Calculate the rate
  rate = call_count / duration_minutes

  return rate
This AI-generated content contains a function summary, argument descriptions, and explains the return value as we discussed previously.
Challenge
Try asking a generative artificial intelligence service such as Google Gemini to read your code.
- Ask it to generate documentation of different kinds.
- Request a review of your code. What does the bot think?
- Can the chatbot create a diagram to illustrate a concept that is relevant to your research software?
This can save you a lot of time, but as with any LLM-generated content, always check the output and ensure it’s correct!
What are the benefits and risks of using a Large Language Model (LLM) service such as Google Gemini or OpenAI ChatGPT to interpret your code and produce content that you use in your research?
How should we critically evaluate this material so that it can be used appropriately to improve the productivity of our research teams without jeopardising our ethics or integrity or causing security risks?
Conclusion
Documentation strings make your code clearer to read and easier for other researchers to use. Also, they make your research software easier to maintain in the long run, saving time and resources. Good docstrings use a clear writing style and everyday language.
Well-documented, reusable research code depends upon good documentation strings. Research collaborators will benefit from clear explanations of the purpose of each function.
- Docstrings are special comments that describe the purpose of a function and its inputs and outputs.
- Structure your docstrings to convey more information, with a concise introduction.
- Documentation strings allow you to break your documentation into bite-size chunks, with one overview comment per function.
Further resources
To find out more about documentation strings, please refer to the following resources:
Python
- Python PEP 8 Documentation Strings
- NumPy style guide describes the syntax and best practices for docstrings in the NumPy project.
R
- Function documentation in R Packages by Hadley Wickham
Content from Code readability
Last updated on 2026-04-29 | Edit this page
Overview
Questions
- What is code readability?
- How do I make my code easier to interpret?
- How do I explain the purpose of my code?
Objectives
- Understand the common ways to make code easy to read
- Learn how to write code comments
- Learn to document variable types in Python and R
It’s a common trope in the software engineering world that code is read much more often than it is written. It’s important that our code is approachable for new people to use with confidence, as they might want to review the code itself to understand what it does. Also, when you maintain your code, or come back to it in the future, you’ll be grateful for the effort you made in making it easy to interpret and follow its logic.
Syntax highlighting
Many text editors use syntax highlighting to display parts of your source code using different colours or fonts to signify the meaning of each word or symbol. For example, variable names may be given a bright blue colour, strings highlighted in green, and numbers shown in a red font.
Let’s take a look to see its benefits:
Which bit of code is easier to read? What a difference a splash of colour makes! I know which development environment I’d rather work in.
Code editors
To work with our source code in a colourised way like this, use a text editor or IDE with a syntax highlighting feature such as VSCode, PyCharm, or RStudio.
Challenge
Try using some code editing software to apply syntax highlighting to your code.
If you don’t have access to an IDE, you could try the Online syntax highlighting tool by Oleg Parashchenko which can colourise R scripts and Python code.
Meaningful names
Our code should convey as much meaning as possible to the user or developer that’s trying to interpret it.
Variable naming
Every variable has a name and a value. For example,
the code x = 42 creates a variable named x
that has the numerical value of four. But what does x mean?
Is it the number of swallows required to carry a coconut? In this case,
we have no idea.
That’s where meaningful variable names come in.
Always try to name variables using a noun that describes its contents.
For example, in our case we’d use
laden_coconut_capacity = 42 which is much clearer.
Function names
A function contains code that defines the performance of an
action. As with variables, the name of a function
should describe its behaviour so that the user of that
code can anticipate what it will do when they run it. A vague function
name, such as calc(a, b) will be mysterious without any
more explanation. Name your functions using a simple verb
phrase such as calculate_area(width, height) so
it’s easy to interpret their purpose.
Try modifying your example code by renaming the variables and functions.
- How much meaning can you include in these object names?
- What are the limitations of this approach?
Naming conventions
The communities of developers that use each programming language usually follow a conventional approach when naming objects in their code.
It’s also a good idea not to use single-letter names such as
x or T because it may not be clear to someone
else what these represent. Also, avoid the common pitfall of naming a
variable with the same name as an in-built function
such as sum().
Challenge
Try writing a simple example of a research-related script using the style conventions discussed above.
Although these rules aren’t strict, because your code will still run without error, it does help clarify your intentions by describing what type of variable or object is being referred to. Whatever you do, please try to follow a consistent style with your collaborators to avoid confusion.
Comments
Code comments allow us to annotate any part of our software with a human-readable description of the expected behaviour of the code or our general intentions to aid the reader in their interpretation. Start writing these as soon as you begin development work, as they’ll capture your thought process while the knowledge is fresh in your mind, avoiding the risk of forgetting important details.
To add comments to your code, use the # symbol at the
start of a new line, like so:
It’s best practice to use a very concise style when writing code comments. I recommend using active tense verbs.
Try adding comments to your code.
- Which parts of the code will most benefit from comments?
- How long and detailed should comments be?
- How would you refer someone to an external website for more information?
Type hints
Type hints display the expected type of each object in your code. They are a kind of “documentation as code” that annotate the code that’s already there, rather than being written as separate documentation. While they don’t change the way the software works, they can help to improve code clarity and may be used to catch errors early in the development process.
Type hints for variables
When reading source code, it can be useful to know the type of each variable so we get an idea of what possible values they might contain as they move through the system.
Using type hints will make sure your code much easier to read and provide helpful documentation for others, and yourself in the future.
Function argument type hints
They can also be used to label the input and output types of functions. They are not strictly enforced, but act as a guide to the reader.
None of these code examples will cause an error because type hints are just passive labels that document our code. They don’t enforce any type checking or rules that are asserted when the code is executed. This means that, while type hints are very useful for static analysis of code, where we learn something about a piece of software without running it.
Conclusion
This is just a brief introduction to code annotation. For the keen coder, there are many more features and tools available to make your software easier for other people to understand and use.
It will take some time and effort to write these labels, but it will pay off in the long run to think about variables types and make it easier to interpret how the code will behave as it operates. It’s best practice to use an integrated development environment (IDE) that will check your type hints and inform you if it detects a problem with your source code.
- Try to inject as much meaning into your source code as possible by naming things clearly and succinctly.
- Use comments to explain your rationale—even if the code seems obvious to you know, think of the future benefits!
- Label functions and variables with type hints to tell the user what data types are expected.
Further resources
To find out more about the topics covered in this episode, please refer to the following pages:
- The Hitchhiker’s Guide to Python Code Style
- The tidyverse style guide for R
Content from Contributor guidance
Last updated on 2026-04-29 | Edit this page
Overview
Questions
- How do I introduce new contributors to my research software project?
- What is the best way to communicate processes such as bug reporting?
- Where should I write up the design and structure of the system?
Objectives
- Learn to write a contribution guide for research code
- Learn about software coding standards
- Implement ways to facilitate communication between researchers that are engaged in the project
- Provide a high-level understanding of an existing codebase
Collaborative research software development
Often, in today’s research environment, much analytics software is written in a collaborative manner, involving multiple specialists from within a team, or from multiple institutions. For the long-term health of a software package, it’s important to encourage potential contributors to get in touch and feel welcome to take part. Useful research software can take on a life of its own.
Research software project management
For more information on planning the development of research software and project governance, see Module 1a on Software Management Planning.
It’s often published using an open source licence, which means that all the code is publicly available and may be used and modified by anyone, within certain conditions (see module 1b to learn more about software licensing.)
There’s a lot more to creating and managing a sustainable community around a research software project, but having a central piece of documentation for contributors is a great start!
Consider these questions amongst the group:
- How can we effectively foster a collaborative environment for research software development?
- How can barriers to participation be removed for a diverse range of individuals and institutions?
- What strategies can be implemented to ensure that all contributors feel valued and included?
Contribution guides
Contribution guidelines help users and understand how they can help to improve the software, whether that’s by submitting bug reports, suggesting new features, or writing better code and documentation. All of these aspects are vital to produce reusable research software.
Potential collaborators should be able to easily find out how to take part and contribute. Developers should be encouraged to use appropriate communication channels to ask questions and inform others of proposed software changes. The contact details for the project administrator or committee should be available and they should be welcome and responsive to any queries.
It’s important to explain how the project is managed so the process for evaluating new features and getting them implemented is clear, such as the code review and approval process. For many projects, a ticket system may be used to raise issues and suggest new features. Software developers often propose new code by creating a branch on the version control system (such as Git) and requesting for those changes to be merged into the main codebase.
Contribution guides will save you time in the long run, because it provides an on-ramp for people to get involved, prevents them from getting confused, and reduces the amount of incorrectly-submitted bug reports or requests for change, etc.
Discuss these issues amongst the group:
- What essential components should be included in a comprehensive documentation for research software contributors?
- How can we make onboarding new contributors a smooth and welcoming process, ensuring they have the necessary information and support to be successful?
- How can we balance the need for clear guidelines with the desire to encourage creativity and innovation?
How to write contributor guidance
The standard practice for authoring a contribution guide for a
software project is to create a file called CONTRIBUTING.md
in the root folder of your project. This is a Markdown file that
introduces new people to the project. It lets people know the ways they
can take part in the research software project and what to do to get
involved.
The specific contents of this file depend upon the kind of research project, but some useful information to provide typically includes:
- An introduction to the organisation and structure of the code, possibly including diagrams.
- Instructions to raising issues, suggesting new features, and proposing code changes.
- Links to additional documentation that’s hosted elsewhere, such as a code of conduct or discussion forum.
- A walkthrough to setting up a development environment, such as guidance on installing developer tools or other prerequisites.
On code repository hosting platforms such as GitHub, the contribution
guide will be created automatically using this
CONTRIBUTING.md Markdown file.
Challenge
Create a new file called CONTRIBUTING.md and populate it
with a few sentences.
- What are the most important things for a new contributor to know?
- What should a user do if they encounter a bug?
- What are the common questions that a new developer might have when they work on this research software?
Software project governance
Project governance defines the scope and aims of a research software engineering project, and determines how decisions will be made and carried out. It sets out the processes and responsibilities that collaborators must understand to take part. This is something that should be considered when preparing a software management plan, as discussed in Module 1a of this course. This is important to make sure that questions of who does what, and how, are stated clearly so that everyone can understand and collaborate effectively to produce excellent research software. It’s worthwhile to think about this early on in a project to avoid potential pitfalls later on!
Code of conduct
A code of conduct provides guidelines for the expected behaviour of people who are involved in the project. You may want to provide some general tips to create a productive community of researchers around the software, such as creating positive interactions between contributors, treat others with respect and dignity, and recommendations for processes for handling differences of opinion.
This has the following advantages:
- Fosters a healthy, collaborative working environment where people feel respected, included, and can freely share ideas.
- Managing expectations and creating clear rules will reduce the amount of time wasted due to misunderstanding and conflicts.
- Build a communinity: an ethically-run and transparent project will encourage contributors to share the values of the project and remain engaged.
For many working in a research context, there are additional considerations to ensure that institutional policies, ethics, and data protection regulations are carefully observed. These protocols are outside the scope of this document, but these factors should be clearly communicated to all contributors.
When you place a CODE_OF_CONDUCT.md file in the root of
your repository, GitHub will recognise it as a community
health file and render it as a dedicated tab on the repository’s
home page, making it easy for contributors to find.
Contributor Covenant
Many open-source research software projects adopt the Contributor Covenant, which is a template charter that may be customised to suit the needs of your collaborators.
Challenge
Create a new file called CODE_OF_CONDUCT.md in the root
of your project and draft a short code of conduct for your
contributors.
- What behaviours do you want to encourage in your community?
- What behaviours are unacceptable?
- How should people report concerns, and who is responsible for responding?
You may wish to start from the Contributor Covenant template and adapt it to suit your project.
Developer notes
It’s useful to write guidance for software engineers who will contribute new features and improvements to the research software. Unlike the README file, this documentation is aimed at new software developers, rather than end-users of the software package. They should be able to create a “development environment” that allows them to modify the codebase as well as run it.
For people who are contributing technical skills to the project, they’ll need the following information:
- Which version control system is being used. Typically, this will be
gitor similar tools, as discussed in Module 2 of this course. - How to add automatic tests and whether a testing framework is in place.
- Describe the code organisation and package structure.
Technical documentation
System documentation is important for new contributors to familiarise themselves with the codebase and as a reference for existing engineers. There should be a concise description of how the system works from a more technical perspective, with the intended audience being software developers, rather than the research users.
An architecture diagram is an efficient way to provide a “map” to help developers to understand and navigate a complex system.
Coding conventions
Many projects follow a set of programming standards to manage code quality. A coding style guide will help to ensure consistency across all the code written as part of a collaborative project, which helps others to read and interpret the code, making it easier to maintain in the long run. The code style rules should cover things like the way to describe functions, how to indent code, and naming conventions for variables.
This might include guidance and advice, or more strict rules as standards that are checked by a code linter. A code linter is an analysis tool that inspects code and checks for common errors and problems, producing a report for the developer to read and act upon. Common coding style standards include the PEP 8 style guide for the Python programming language and the tidyverse style guide in the R statistical language.
Discuss these issues as a group:
- Why are coding conventions important for collaborative research projects?
- How can we establish and enforce coding style guidelines that promote consistency and readability?
- Encourage collaboration: There are many ways to contribute to a research software project, including bug reports, feature suggests, design discussions, documentation, and software engineering.
- Clear processes: Explain the process for making changes and having them included into the code
- Bug reports: Create simple ways for users to report issues and have these problems resolved in a timely manner.
- Communication: Create appropriate communication channels so that design discussions and proposed changes may be worked through transparently.
Further resources
To find out more about creating healthy communities of developers to collaborate on research software engineering projects, please visit the following resources:
- GitHub Docs Setting guidelines for repository contributors
- H. Gruson and H. Turner Software Sustainability Institute Opening the door to new contributors in open source projects
- Stephan Druskat And then there were users: Designing governance for open research software projects Talk at RSECon23 in Swansea.
Content from Documentation sites
Last updated on 2026-04-30 | Edit this page
Overview
Questions
- How do I present comprehensive information to users of my research software?
- How do I generate a website containing a user guide to my code?
- What should a good documentation website contain?
- How do I publish my software documentation on the internet?
Objectives
- Learn about documentation websites for software packages.
- Gain basic familiarity with some common website generation tools.
- Understand the basics of structuring a documentation website.
- Be able to set up a static site deployment workflow.
Documentation websites
A documentation website is a user guide and reference manual for a library of research code. Up to now, we’ve looked at ways to put helpful notes in our code, but now we’ll learn how to write a longer, more complete guide to the research tools you create.
A documentation site brings all your user guidance into one place. This kind of resource may be prepared for research software and will usually contain an introduction, installation instructions, a user guide, troubleshooting tips, and an in-depth reference section.
To get an idea of this, here are some links documentation websites for widely-used data analysis and research software packages:
- pandas is a data processing library for the Python programming language.
- ggplot2 is a plotting package for the R statistical language.
- scikit-learn is a machine learning library for the Python programming language.
Evaluate these documentation sites.
- What do you like about them?
- How approachable are they as a new user?
- What do you find difficult to understand in this material?
Keep these impressions in mind as we explore what makes a good documentation site and how to build one.
Why create a website?
There are many advantages to building a documentation site to provide a information-rich resource for researchers who use your code at institutions all around the world.
Advantages
These sites can work as hubs for collaboration, sharing the latest updates, and encouraging people to take up your system and get involved in improving it. The effort of setting one up will be rewarded in the long run because you will have created a valuable asset that will foster collaboration and knowledge sharing in your research community.
A key foundation stone of modern digital research practices is the ability to replicate results by reproducing analytic workflows. Clear, thorough documentation of the research code ensures that researchers can repeat processes and verify results and other people’s outputs.
Documentation sites are really useful for introducing new users to your software. It makes it much easier and faster for new users to get started using your software to boost their research. It’s one of the most effective ways to create a user base that has a sophisticated understanding of the research code, which is essential for them to adapt it to the complex problems that often arise in research contexts.
They’re also a valuable resource for your existing user base, enabling them to look up reference material or search the manual to find new capabilities they weren’t aware of before. This will increase the potential for your software to increase the productivity of other research teams.
When to use one
Although the advantages are numerous, not all software packages require a comprehensive documentation website. However, for any code project that is growing in the number of collaborators, users, and technical complexity, consider coordinating the team to write one as soon as possible to help the project continue its healthy growth.
When is it appropriate to establish a documentation website? Consider the following factors:
- How many resources will it take to write and maintain?
- How many end-users need the information?
- Is there a simpler format that can convey the same information?
Once you’ve decided to create a documentation site, the next step is to decide what to put in it and how to write it.
Writing style
As we discussed in the episode on READMEs, it’s important to strive to use everyday, jargon-free language. It helps to set an approachable tone that encourages others to use the software and get involved with the project. This will ensure that the code is accessible to the widest possible layers of the research community and foster collaboration.
Always consider the target audience of your documentation, because your user base may be unaware of some of the unstated assumptions and technical background knowledge that you take for granted.
Contents
Documentation pages contain comprehensive information about a particular piece of research software. Think of it like a user manual for your car or an instruction guide for building a piece of furniture.
Research context
For research software, it may be important to explain the theoretical background or statistical methods that are used and explain the domain-specific assumptions that were made when the code was designed and written. It’s good practice to provide a concise summary of the relevant concepts and link to external sources such as papers, books, and other websites for users to take a deeper dive into the principles and algorithms used.
Installation instructions
This section provides a detailed walkthrough of the steps required to install the package onto their computer, with details that are specific to their operating system.
Tutorials
It can be very useful to include an in-depth “Getting Started” guide that provides step-by-step instructions to introduce a new user to your software package. It might guide the user through each aspect of the tool’s functionality and features so they’re able to become familiar with it in a more approachable way.
A series of code examples to demonstrate how to use the software in different contexts can be very useful for users to get off the ground in implementing common research workflows to achieve their specific goals.
User reference
If you have written functions that are intended to be used in other researchers’ code, then an in-depth explanation of these procedures is essential reference material. In the world of software engineering, these detailed appendices are called API references, which list each function and describe how the arguments may be used to control how the code works. This content may be automatically generated from the documentation strings.
Troubleshooting
As issues come up with your research code, and are eventually resolved and clarified, make a note of the causes of these troubles and make them available to the entire user base in your documentation site. This will help users to identify and fix common misunderstandings and technical problems they may run into when utilising your code.
This prevents a situation where potential solutions to common issues do exist, but are scattered around the internet and are the exclusive knowledge of a few individuals and are hard to find.
Tools
There are various tools available to build documentation sites for your research software. The right choice depends on your programming language, the complexity of your project, and how much control you need over the site’s appearance.
GitHub Wiki
If you are publishing your code on GitHub, which is a web service that hosts code repositories, then one of the easiest ways to create a documentation site is to use the wiki feature on that platform. This is a great way to write detailed, structured documents containing long-form content that describes aspects of your software. What’s more, it’s available alongside your code so your documentation and software are located in one place.
As with readme files, the text that appears on GitHub is formatted using Markdown syntax.
Getting started
To create a wiki, which is a simple, easy-to-edit web site, go to the main page of your code repository on GitHub and click on the Wiki button on the top menu. For a detailed walkthrough of this process, please read adding or editing wiki pages on the GitHub documentation.
GitHub Wikis
For more information about the wiki feature on GitHub, see Documenting your project with wikis on the GitHub documentation.
Create a wiki page
Navigate to your code repository on GitHub and create a wiki. Add a page that describes how to install your software.
Consider what information a new user would need to get started. How does it feel to write for that audience?
Standalone site generators
For projects that need more structure, customisation, or automatic generation of content from code, standalone site generator tools are a good choice.
MkDocs
MkDocs is a tool for building documentation websites that is popular amongst developers of Python packages, although it can be used to document code written in any programming language. It takes a collection of Markdown files and turns them into a polished static website ready to publish on the internet.
MkDocs is designed to be simple to set up: a single configuration
file (mkdocs.yml) controls the site, and all of your
content is written in plain Markdown — the same syntax you used for your
readme files. The mkdocstrings plugin can
automatically generate reference pages from your code’s documentation
strings.
If you’re following along in Visual Studio Code, two extensions make editing the files in this episode noticeably easier:
-
Markdown
All in One — adds a side-by-side live preview
(
Ctrl + Shift + V), table-of-contents generation, and automatic list continuation while you edit the files indocs/. -
YAML
by Red Hat — provides schema validation and key completion for
mkdocs.yml, which helps catch indentation mistakes early.
Both extensions can be installed from the Extensions view
(Ctrl + Shift + X).
MkDocs itself is language-agnostic — it simply converts Markdown into
a website, so you can use it to write prose documentation for code in
any language, including R. However, the mkdocstrings plugin
used below to auto-generate reference material only understands
Python.
If you are documenting an R package, the standard tool is pkgdown, which generates
a documentation site directly from your package’s
DESCRIPTION file, vignettes, and function documentation.
For a full walkthrough, see the Website chapter of R
Packages by Hadley Wickham and Jennifer Bryan.
Getting started
Let’s use MkDocs to create a documentation site for our Python code.
Working in VS Code
If you’re using Visual Studio Code (the recommended editor for this course), the upcoming steps fit naturally into a single window:
- Open your project with File → Open Folder… so the file explorer, editor, and terminal all share the same workspace.
- Open the integrated terminal with Terminal → New Terminal or Ctrl + ` (backtick) — every terminal command in this episode can be run there.
- Edit
mkdocs.yml,docs/index.md, anddocs/reference.mdin VS Code’s editor tabs rather than a separate text editor.
Installing MkDocs
Navigate to the root folder of your code project. Create a virtual
environment using venv which is a
separate area in which to install the MkDocs package. This command will
create a virtual environment in a directory called
.venv/
This will create a subdirectory that contains the packages we’ll need to complete the exercises in this section.
Run the activation script to enable the virtual environment. The specific command needed to activate the virtual environment depends on the operating system you are using.
If you’re using Visual Studio Code, you can skip the activation command — see the spoiler below.
In Visual Studio Code, you usually don’t need to run the activation
command yourself. Shortly after .venv/ is created, VS Code
shows a notification — “We noticed a new environment has been
created. Do you want to select it?” — click
Yes.
If the prompt doesn’t appear, open the Command Palette (Ctrl
+ Shift + P, or Cmd + Shift + P on macOS),
choose Python: Select Interpreter, and pick the one inside
.venv/.
Once the interpreter is selected, any new integrated terminal you
open (Ctrl + `) will activate.venv/
automatically, so you can skip the
source .venv/bin/activate /
.venv\Scripts\activate step. This also avoids PowerShell
execution-policy errors that some Windows learners see when activating
manually.
If you already have Python installed via Anaconda, Miniconda, or Miniforge, you may prefer to use conda to manage your environment. Conda is a single tool that installs both Python itself and the packages you need.
Create a new environment called oddsong containing
Python:
Activate the environment. The same command works on Windows, Linux, and macOS:
Once the environment is active, the pip install command
shown below works inside it just as it does inside a venv
environment, so you can continue with the rest of the episode without
changes. Because the conda environment lives in a central location
managed by conda — not a .venv/ folder in your project —
there is nothing extra to add to .gitignore for it.
For more information, see Managing environments in the conda user guide.
Use the Python package manager pip to install
MkDocs, along with the mkdocstrings plugin for
generating reference material from Python code.
MkDocs 2.0 is on the horizon (see the MkDocs
2.0 announcement) and introduces changes that may break the
configuration used in this episode. Pinning the installation to the
1.x series ("mkdocs==1.*") ensures that the
commands and mkdocs.yml shown here continue to work as
written.
When you run mkdocs with a 1.x release, you may see a
warning about the upcoming 2.0 release. To silence it, set the following
environment variable before running MkDocs:
Once you’re comfortable with MkDocs and ready to upgrade, drop the version pin and follow the official migration guide.
Start a new MkDocs project
MkDocs includes a command to scaffold a new project. Navigate to your project’s root folder and run the following command.
This creates two things:
-
mkdocs.yml— the configuration file for your site. -
docs/index.md— a starting page containing placeholder content, written in Markdown.
Your documentation content lives inside the docs/
folder. You can add as many Markdown files as you like, and they will
become pages of your site.
Configure the site and plugins
Open mkdocs.yml and replace its contents with the
following:
-
site_namesets the title that appears in the site’s header and browser tab. -
pluginsis a list of extensions that add features.searchenables a full-text search index, andmkdocstringslets you pull documentation directly from your Python source code.
MkDocs options
To find out more about the MkDocs configuration file, please read the Configuration documentation.
Previewing the site locally
MkDocs includes a built-in development server that rebuilds and refreshes the site automatically as you edit files. This makes it very fast to see the effect of your writing.
The --strict flag tells MkDocs to treat warnings (such
as broken links or missing files) as errors, and --verbose
prints extra detail about what it is doing — both are very helpful while
you are editing.
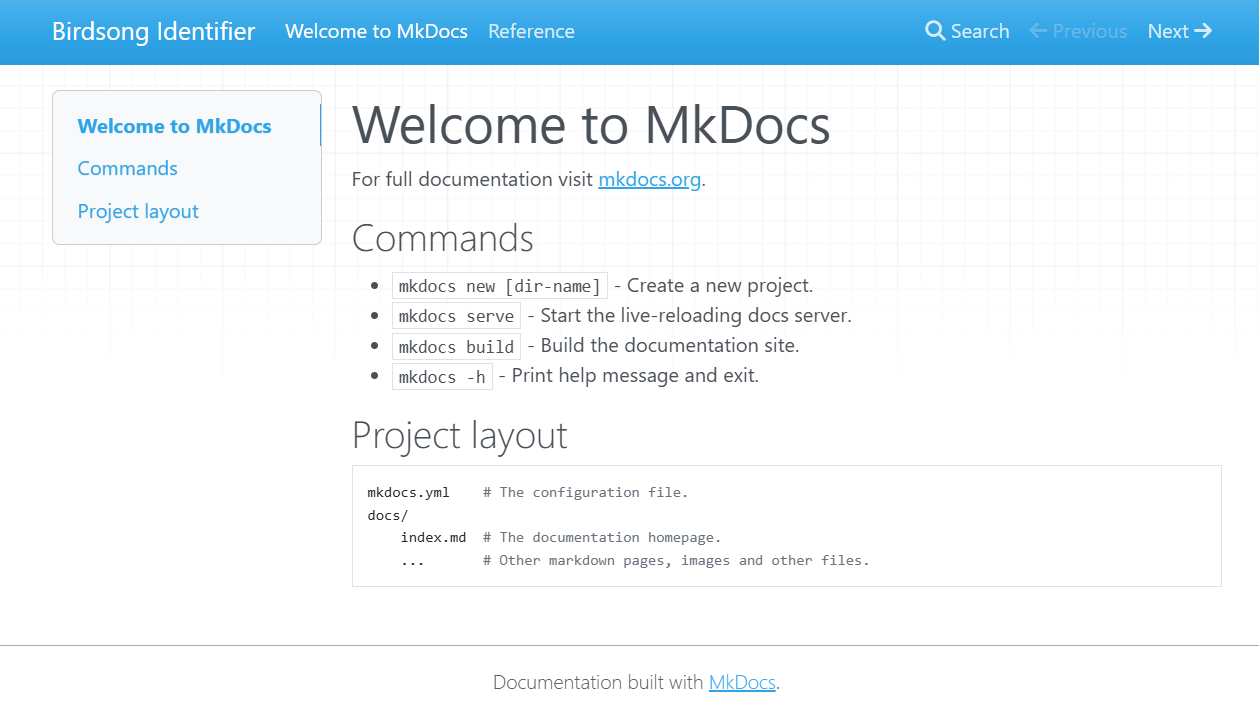
Open your web browser to http://127.0.0.1:8000 to view
your documentation site. If you’re running this from the VS Code
integrated terminal, Ctrl + click the URL to open it in
your default browser without copy-pasting. Leave the command running
while you work — any time you save a Markdown file, the browser will
reload with your changes. Press Ctrl+C to stop the
server.
Building the site
In this context, building means taking our collection of Markdown files and converting them into the source code files that define a website. MkDocs will create HyperText Markup Language (HTML) files, which is the markup language for pages that display in a web browser commonly used on the internet.
To build our site, we run the following command.
MkDocs will load our files from the docs/ directory and
output the built HTML files into a directory called
site/.
The file site/index.html contains the home page of your
new documentation site! Open that file to view your handiwork. In VS
Code’s file explorer, right-click site/index.html and
choose Reveal in File Explorer (Windows) or
Reveal in Finder (macOS) to open the folder in your
operating system, then double-click the file to launch it in a
browser.
Automatic reference generation
It can be useful to automatically populate our documentation sites by
converting our documentation strings into
formatted text. We can achieve this using the mkdocstrings plugin, which we
already installed and enabled in mkdocs.yml.
Adding a reference page
Create a new file docs/reference.md with the following
contents.
Why ::: oddsong?
This line is a mkdocstrings directive that tells the
plugin to scan a Python module and insert its documentation strings into
the page at this location:
- The leading
:::marks the line as anmkdocstringsdirective rather than ordinary Markdown. -
oddsongis the dotted import path of the Python module to document — in this case the fileoddsong.pyin your project’s root folder. If your code lived in a package such assrc/oddsong/__init__.py, you would still write::: oddsongbecause that’s the name you would use in a Pythonimportstatement.
When the site is built, mkdocstrings imports the module,
reads the docstrings of its public functions, classes, and variables,
and renders them as formatted reference content — saving you from
copy-pasting documentation by hand.
For more options (such as filtering members, hiding the source, or customising the layout), see the mkdocstrings Python handler documentation.
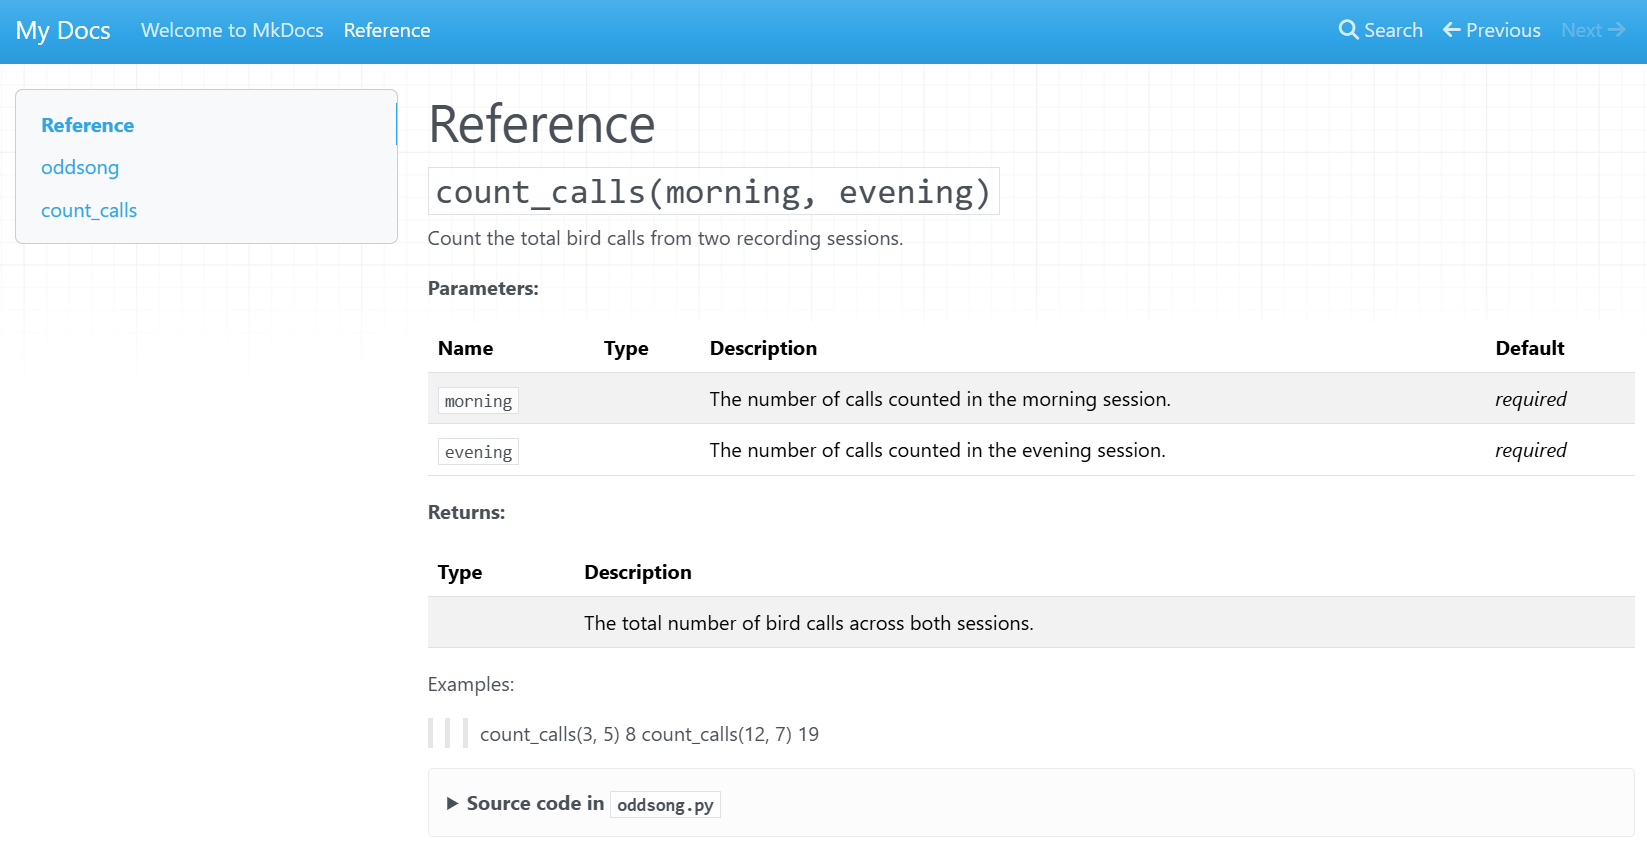
Now, when we build our site, MkDocs will scan the contents of the
oddsong Python module and automatically generate a useful
reference guide to our functions.
Automatically generate content
Try using mkdocstrings to analyse your own code and
build a documentation site by following the steps above.
After the mkdocs build command has completed
successfully, browse the contents of the site/ folder and
discuss what you find.
Publishing
Now that you’ve started writing your documentation website, there are various ways to upload it to the internet so that others can read it.
In this episode, we’ll focus on GitHub Pages, a free hosting service built into GitHub. It can automatically build and publish your site whenever you push changes to your repository, making it a convenient choice if your code is already hosted on GitHub.
GitHub Pages is not the only option. Other hosting services popular with researchers include:
- Read the Docs is a dedicated documentation hosting platform that supports MkDocs and other popular generators. It automatically rebuilds your documentation when you push new commits and provides versioned documentation so users can browse the docs for older releases of your software.
- GitLab Pages is the equivalent of GitHub Pages for projects hosted on GitLab, including self-hosted GitLab instances that some universities run for their researchers.
- Netlify and Cloudflare Pages are general static-site hosts with free tiers that work well for documentation built with MkDocs or similar tools.
All of these platforms offer free tiers for open-source projects. GitHub Pages is the simplest to set up when your code already lives on GitHub, while Read the Docs provides more documentation-specific features such as version switching and a documentation-focused search.
GitHub Pages
Before you start
Your repository must be public (or you must have a GitHub Pro account) and already pushed to GitHub.
MkDocs provides a built-in command to publish your site to GitHub Pages. From your project’s root folder, run:
This builds your site and pushes the output to a branch called
gh-pages on your GitHub repository. GitHub Pages will then
serve the site from that branch.
Once the command completes, the published URL is shown in the terminal output. You can also find it under Settings → Pages in your repository.
Automating deployment
Running mkdocs gh-deploy manually works well for small
projects, but for collaborative repositories it’s common to automate
this with a GitHub Actions workflow that rebuilds and redeploys the site
on every push to main. Configuring Actions is beyond the
scope of this episode — see Deploying
your docs in the MkDocs documentation for an example workflow.
Check your Pages settings
The mkdocs gh-deploy command pushes your built site to a
branch called gh-pages, but it does not configure the
GitHub Pages settings for you. For a brand-new repository, GitHub will
usually enable Pages automatically the first time this branch is pushed,
and your site will appear within a minute or two.
If your site does not appear, go to Settings → Pages
on your repository and check that the source is set to Deploy from a
branch, with the branch set to gh-pages and the folder
set to / (root). For more details, see Configuring
a publishing source for your GitHub Pages site in the GitHub
documentation.
Update .gitignore
Add site/ to your .gitignore file so the
local build output is not committed to the repository.
Publish your MkDocs site
Follow the steps above to publish the MkDocs documentation site you built earlier to GitHub Pages.
Once the workflow has run successfully, share the URL with a neighbour and check that each other’s sites are accessible.
- Structured documentation websites are very useful for users to learn to use all kinds of digital systems, ensuring its successful adoption by the wider research community.
- Documentation sites contain comprehensive installation instructions, user guides, and troubleshooting tips.
- There are several libraries that may be used to generate documentation sites.
- Documentation websites can be published to GitHub Pages using the
mkdocs gh-deploycommand.
Further resources
Please review the following material which provides more information about some of the topics covered in this episode.
- MkDocs Getting Started
- mkdocstrings
- GitHub documentation About wikis
- Write the Docs Tools for documentation writing
Content from Command line interfaces
Last updated on 2026-03-10 | Edit this page
Overview
Questions
- What is a command-line interface (CLI)?
- Why are they useful for making software easier to use for researchers?
- How do I create a CLI for my research code?
Objectives
- Learn what a command-line interface is
- Understand the benefits of CLIs for making research code more accessible
- Gain a basic familiarity with the
argparsemodule in Python
Command line interfaces
A command-line interface, usually abbreviated to CLI, is a terminal or prompt that accepts text input that instructs a computer what to do. They are used to start programs and perform actions within the computer’s operating system.
In this section, we’ll introduce the concept of providing a command-line interface to our research code to make it easier to use and provide a well-documented “entry point” to our software.
Advantages of CLIs for research tools
Command lines are a way of interacting with a digital system that go back to the early history of computing. They might seem old-fashioned because typing out commands means that there is no graphical component. It may seem restrictive because your mouse isn’t used, but terminals have a lot of power because we can formulate our instructions to the computer by writing commands. We have a direct line to control our computer’s operating system.
It’s a great way to “talk” to your computer because you can record the commands that you’ve run to provide a documented history of a research process. (We could record a video screen capture of your working procedure, but that’s much less efficient.)
Terminals are more efficient for running repetitive tasks and provide extra functionality for advanced users. They are an cost-effective way to provide a user interface for research software, as research teams often lack the resources and know-how to produce sophisticated graphical user interfaces.
Using the terminal
There’s a lot of powerful commands that can be learned to take full advantage of the command line, but here we’ll just address the basics to help us make our research software easier to use by providing a well-documented CLI.
This section will briefly introduce you to using the terminal to achieve simple tasks. For an an in-depth course on using the command line, please study the The Unix Shell Software Carpentry course.
How to open the command line
Each operating system has a slightly different terminal interface, but they work in basically the same way.
Example commands
An example of a CLI command is a simple text command that performs some action or interacts with the computer operating system.
Let’s examine a simple one-word command that lists the files in the current directory.
Arguments
Commands have options that allow the user to choose what the tool will do.
When using shell commands, we use the words option, flag, and arguments to describe parameters that we can use to modify the operation of that command and the inputs used to initialise our code.
Challenge
Try the command line statements described above.
- How would you seek further help if you encounter an error?
- What response does the terminal provide? Is this what you expect?
CLIs in R
This rest of this episode is focussed on the Python programming language.
R, while a powerful statistical computing language, doesn’t have a built-in module specifically designed for creating CLIs. Unlike Python, this means that you’ll need to use external packages or write your own functions to handle command-line arguments and options.
However, there are several packages that can help you create to CLIs in R:
These packages create CLIs for your R scripts, making them easier to distribute for others to use.
CLIs in Python
We can add a command-line interface to our Python code using the methods and tools that are included in the Python programming language.
Getting started
Let’s continue working on our birdsong identification software project and create an entry-point to our code.
To create an executable script that will run from the command line,
create a file called oddsong/__main__.py. When a user runs
our code from the terminal, this __main__.py file will be
executed first.
This is a mechanism that tells Python how we want users to interact with our software.
To find out more, please read the __main__.py section in the Python documentation.
To run our code as a script we use the Python
-m option that runs a module as a script.
This will execute the oddsong module by running our
oddsong/__main__.py file.
main() functions
main functions are used to as the primary “starting
point” for a command-line interface, otherwise known as an “entry point”
for our scripted sequence of commands.
Inside this file, create a function called main() and an
if statement as shown below.
When the user executes our CLI, Python will know to run the
main() function and execute our research code. In this
case, our research code hasn’t been written yet, so we’ll just show a
message on the screen for now.
The logical statement if __name__ == "__main__" means
that the main() function will only run when the
code is run from the command line as the top-level
code environment.
CLI documentation
Python has a useful inbuilt module called argparse to quickly create a command line interface that follows the standard conventions of the Linux software ecosystem.
To get started, attempt the challenge below.
Challenge
In this exercise, we’ll create an instance of the argument parser tool. Let’s edit our Python script.
First, load the argparse library using the import
keyword, which is conventionally done at the top of the script.
Then, we’ll add the argument parser to our main() function
so it loads when the script runs.
PYTHON
import argparse

def main():
    # Define command-line interface
    parser = argparse.ArgumentParser()
    parser.parse_args()

    print("Identifying bird vocalisation...")

if __name__ == "__main__":
    main()
This creates a basic command line interface. Let’s try it out.
What do expect to see? What actually happens?
Now let’s ask for help! Run the following command to view the usage instructions:
What should we see when using the --help flag? What
happens in your terminal?
When we run our script as before, it will run like normal with no change in behaviour.
But, if we invoke the command-line interface using any arguments, then this new functionality kicks in.
BASH
$ python -m oddsong --help
usage: test.py [-h]

options:
  -h, --help  show this help message and exit
This is the default output of a CLI with no additional arguments
specified. The first line displays the usage instructions. This means
that we may execute test.py with an optional help option
using --help or -h for short. Optional flags
are denoted with square brackets like this [-h].
The parse_args() method runs the parser and makes our
arguments available to the user on the command line. This makes the
default --help flag available which displays instructions
and notes that we can customise. As we continue to develop our CLI by
adding arguments, each one will be listed and described in this help
page. This is an excellent way to document our software and make it
available to researchers!
Arguments
But what if we want to take an input from the user? We add arguments to our CLI using the following syntax.
This will create an argument called args.file that the
user can specify when they run our script, and that we can use in our
code to do something useful.
Challenge
Add this argument to our script and note the changes to the user interface.
The code now looks something like that shown below.
PYTHON
import argparse

def main():
    # Define command-line interface
    parser = argparse.ArgumentParser()
    parser.add_argument('-c', '--category')
    parser.parse_args()

    print("Identifying bird vocalisation...")

if __name__ == "__main__":
    main()
Note that we add the argument before we parse them, which makes them available to use.
Now, when we invoke the help screen, we see our new “category” argument listed.
BASH
$ python -m oddsong --help
usage: oddsong.py [-h] [-c CATEGORY]

options:
  -h, --help            show this help message and exit
  -c CATEGORY, --category CATEGORY
The layout of this text is done for us and follows the standard conventions of terminal tools.
Of course, if you’ve imbibed the spirit of the course, you’ll notice that our new category parameter is completely undocumented! It’s unclear what it is or how to use this option.
Argument descriptions
To provide a concise explanation for each parameter we use the
help argument of the add_argument()
function as shown below.
PYTHON
# Add the category argument
parser.add_argument('-c', '--category',
    help="The type of bird call e.g. alarm, contact, flight")
This text should briefly describe the purpose of the argument, without going into too much detail (which should be covered in the user guide.)
Challenge
Add a description of the --category argument using the
add_argument() function. What change do you expect to
happen in your CLI?
We can achieve this in our example script by adding a
help string.
PYTHON
import argparse

def main():
    # Define command-line interface
    parser = argparse.ArgumentParser()
    parser.add_argument('-c', '--category',
        help="The type of bird call e.g. alarm, contact, flight")
    parser.parse_args()

    print("Identifying bird vocalisation...")

if __name__ == "__main__":
    main()
Now, when we call the --help option, we see this
description as an annotation to that argument.
There’s a lot
more to learn about command line arguments, including several
powerful features of the argparse library, but these are
beyond the scope of this course.
Description
We can provide a simple summary of the software that will be
displayed on the --help screen of our CLI by using the description
argument when creating our argument parser object. This should
concisely inform the user about the purpose of the tool and how it
works.
PYTHON
# Describe the software
parser = argparse.ArgumentParser(
    description="A tool to identify bird vocalisations.")
Challenge
Write your own description for our software. Where does it display on our help screen?
We define the description when creating our argument parser object.
PYTHON
import argparse

def main():
    # Define command-line interface
    parser = argparse.ArgumentParser(
        description="A tool to identify bird vocalisations.")
    parser.add_argument('-c', '--category',
        help="The type of bird call e.g. alarm, contact, flight")
    parser.parse_args()

    print("Identifying bird vocalisation...")

if __name__ == "__main__":
    main()
This text is displayed after the usage instruction.
Usage
By default, the usage message is generated automatically based on the arguments of our script. For our example, the usage instructions look like this:
In most cases, this will do the job. If you want to overwrite this
message then use the usage
parameter when creating the argument parser object.
There are several other options to customise your CLI, but we’ve covered here the primary ways to document your research software to make it easier to use by your collaborators and other researchers.
- Command line interfaces (CLIs) are terminal commands that provide an easy-to-use entry point to a software package.
- Researchers can use CLIs to make their research code easier to use by providing well-documented options, hiding the complexity of the software.
- Most programming languages offer frameworks for creating CLIs. In
Python, we do this using the
argparselibrary.
Further resources
To find out more about command-line interfaces and using the terminal to improve your productivity for research computing, please refer to the following resources:
- Learn more about using the terminal in the Software Carpentry Unix Shell course.
- There are Python packages such as Click that provide a framework for building bigger, more complex command-line interfaces.
- To learn about distributing your CLI so others can easily install and use it, please see the packaging module in this course series.