

All in One View
Content from What is Computational Reprodicibility?
Last updated on 2026-01-14 | Edit this page
Estimated time: 10 minutes
Overview
Questions
- What is computational reproducibility?
Objectives
- Learn about computational reproducibility
Making your results and code reproducible
You have just finished your latest research project. The paper has been accepted by the journal (only minor revisions, yay!), the data is organised and ready to be placed in a repository, and your code is under version control and ready to be made public. So you’ve done everything to make your results reproducible, right?
Does simply making your source code publicly available equate to
making it reproducible?
If it doesn’t, what do you think can go wrong?
The code won’t run
The code runs but doesn’t produce the same result
Hardwicke et al. (2018) found that code from approximately one-third of 35 articles in Cognition produced the reported results.
Obels el al. (2020) found that of 36 registered-reports with data and code available the main results in just over half were computationally reproducible.
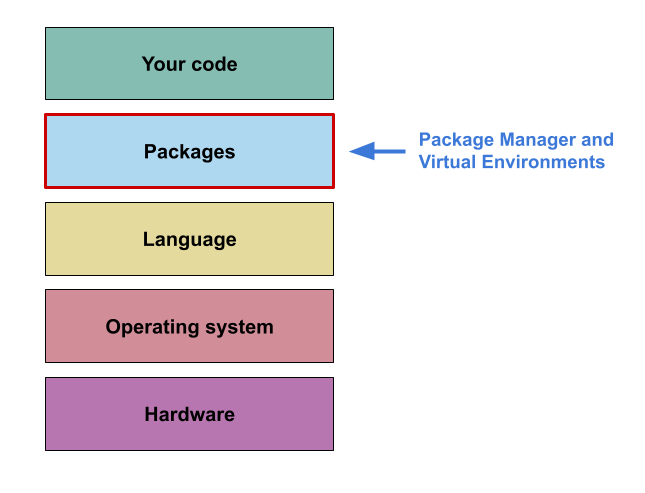
Your code is just the tip of the pyramid of your computational environment, and to ensure that your results are computationally reproducible you will need to capture some of that computational environment.
Your computational environment
A simplified way to think about your computational environment is to divide it into 5 layers, each with increasing generality:

- At the top is the most specific level: ‘your code’.
This is the code that you produced to analyse your data and get the
final published result.
- Below this is the ‘packages’ layer, containing the
packages you used within your code. These are also bundles of code, but
they serve a more general purpose, being used in multiple different
pieces of (research) software. For example:
numpy,pandas, etc.
- Next is the ‘language’ layer. This is the specific
programming language and version you used. Typically, both your code and
the packages you have used are written in this language, and it consists
of the language syntax as well as some built in packages (in some cases
called the standard library).
- The next layer is the ‘operating system’ layer. Which is a very simplified way of encapsulating all the code that sits between the programming language you are using, and the actual electronic hardware that makes up a computer.
- Finally, you have the actual computer hardware.
What is computational reproducibility?
How would you define computational reproducibility?
A suggested definition:
Computational reproducibility is the degree to which your code can be
run in a different computational context (i.e. either by a different
person, at a different time, on a different machine, or any combination
of these three) and will produce the same or equivalent outcome.
What counts as the same or equivalent will vary between research contexts. In some cases precise byte-for-byte reproducibility is essential, while in others getting results that fall in the same range will be suitable.
The more layers of your computational environment that you are able to capture (going from the top to the bottom layer), the more reproducible your results will be. However, achieving this is accompanied by increasing technical complexity, so choosing the right degree of computational reproducibility for your project is key.
In the next section we’ll look in a bit more detail about package managers, virtual environments, and how we can use them in conjunction to capture the ‘packages’ layer of a computational environment.
- Typically, simply providing your source code does not allow other to reproduce your work.
- Computational reproducibility is the degree to which code can be run in a different context.
- Improving computational reproducibility relies on capturing information about your computational environment.
Content from Capturing computational environments
Last updated on 2026-01-14 | Edit this page
Estimated time: 10 minutes
Overview
Questions
- What is a package manager?
- What are virtual environments?
- How can we use them to capture information about a specific computational environment?
Objectives
- Develop a basic understanding of what a package manager does
- Develop a conceptual understanding of virtual environments
Now you have a better idea of the challenges around computational reproducibility let’s look at how Package Managers and Virtual Environments can be used in conjunction to capture the ‘packages’ layer of your project’s computational environment.
What is a Package and a Package Manager?
As mentioned in the previous section, a package can be broadly
defined as a bundle of code that is designed to accomplish a specific
task. As the name suggests, a Package Manager is a tool used for adding,
remove, upgrade, and keeping track of the packages installed for a
particular piece of software (including programming languages).
As part of this course we will be using the Python programming language,
and so we will be using Python’s built in package manager:
pip. However, many of the concepts discussed apply to other
programming languages.
In the context of your code, the packages you install are also known as the dependencies for your code (i.e. your code depends on these packages being available to work). The packages you install will also have their own dependencies, and these dependencies may have their own dependencies. Generally this is not something you need to worry about, because as part of the installation process the package manager will work out the dependencies of all the packages that need to be installed (a process called dependency resolution), and then install them for you.
For example:
You want to install the pandas package, pip
will check to see which other packages pandas needs and it
will see that one of the dependencies of pandas is the
numpy package.
So when you install pandas, pip will also
install numpy for you.
Package mangers will also keep track of the specific versions of the packages installed for a project, and can produce files allowing this information to be shared. This functionality is a key part of capturing a specific computational environment and we’ll return to it later.
You can learn more about Python packages and how to trun your code into a package in the FAIR4RS Packaging lesson
Where does pip get packages from?
When you install a package using pip it will typically
access the Python Package Index (PyPI)
to download and install that package.
PyPI is an online repository of over 500,000 packages, and is the most
commonly used source for installing Python packages.
It is also possible to install packages from local files, private repositories, or even directly from Github repositories, but this is outside the scope of this lesson.
What are Virtual Environments?
By default when you use pip to install a package it will
be installed in Python’s base environment, and so using pip
alone for multiple projects will result in their dependencies sharing
the same space.
Can you think of a few reasons why this may be a problem?
- Different projects requiring different versions of the same package
(Dependency clashes)
- Could be a package you use directly
- Could also be a dependency of a package you use
- Difficulty identifying which packages are required for which projects (Isolating dependencies)
This diagram illustrates the situation:
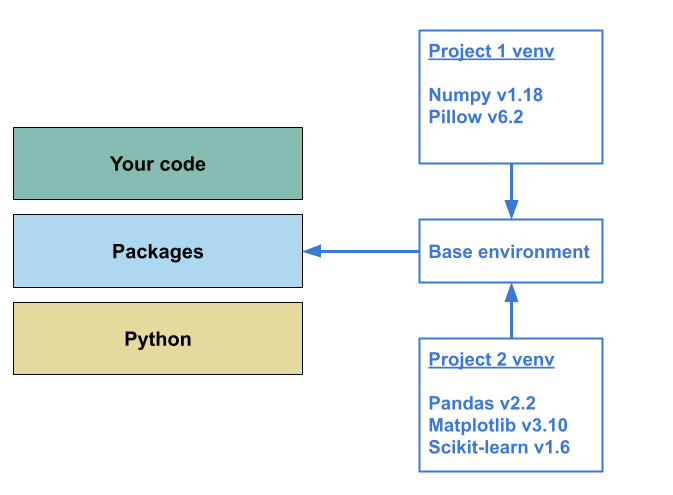
- In this example, ‘Project 1’ requires
numpyv1.18 and while ‘Project 2’ doesn’t directly require a conflicting version ofnumpy,pandasrequires at least v1.22. This creates a dependency clash - You cannot have both versions of this package installed in the same environment, so either:- You break the older project’s computational environment, or
- You cannot develop your new code.
- If you manage to resolve the dependency clash, you still have the
issue that the additional dependencies (namely
pillow) from ‘Project 1’ will also be captured as part of the computational environment for ‘Project 2’. This may not cause any issues, but it is generally not good practice:- When capturing information about the computational environment for a project we only want to include exactly what is required for the reproduction of that project.
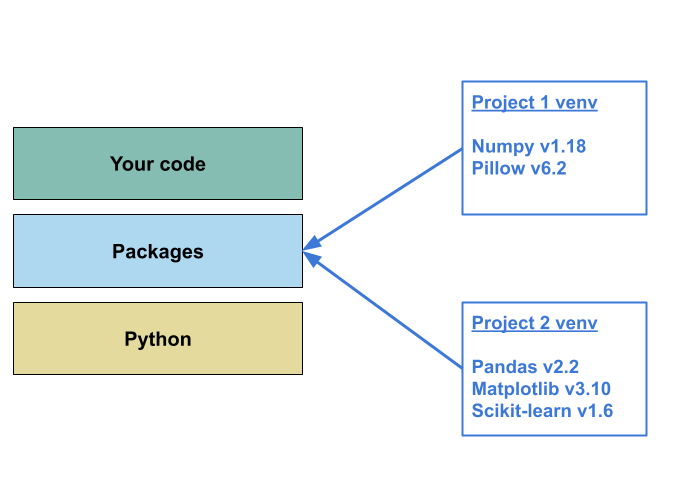
Virtual environments are a tool designed to solve both of these
problems. Conceptually they work by creating a separate, self-contained
space to install packages. Because these spaces are isolated from one
another you are able to install different versions of the same package
for different projects without creating dependency clashes. This
isolation between projects also allows you to accurately capture which
packages were used within a specific project, making it easier to
recreate that aspect of the computational environment in a different
context.
In Python there are several different tools you can use to create and
manage virtual environments. We’ll discuss some of the options later,
but for this course we’ll focus on Python’s built in virtual environment
tool: venv.
Capturing the ‘packages’ level of a computational environment
Now we’ve described Package Managers and Virtual Environments we can outline the steps required to successfully capture the ‘packages’ layer of a computational environment for a project:
Create a virtual environment for your project
Develop your project, installing packages into the virtual environment as needed
Periodically record the packages installed in the environment, ideally to a file alongside the code
In the next section we’ll get to grips with using pip
and venv, and then move onto how to capture the ‘packages’
level of a computational environment using them.
- Package Managers are used to install, remove, upgrade, and track software.
- In the context of Python and other programming languages this software is bundles of other people’s code.
- However, installing all packages to the same place can cause dependency clashes and makes recreating a computational environment difficult.
- Virtual environments are used to deal with this problem by creating isolated spaces where packages can be installed without interfering with one another.
- Using these two tools together allows capture of the ‘package’ level of your computational environment
Content from Getting started with venvand pip
Last updated on 2026-01-14 | Edit this page
Estimated time: 10 minutes
Overview
Questions
- How do I create a venv?
- How do I install packages into my new venv?
Objectives
- Create a new virtual environment
- Learn how to activate and deactivate the virtual environment
- Installing packages in your environment
Introduction
Now we have a grasp of the steps needed to capture the package layer
of the computational environment, so let’s get started with
venv and pip.
Creating a new Virtual Environment
We can set up a new virtual environment anywhere, but it’s generally considered good practice to set it up in the folder for your project.
So let’s start by creating a directory for our project using the terminal, and the moving into it.
Now we can create our virtual environment using the venv
module:
This command consists of two parts:
1. python -m venv - Create a new python virtual
environment
2. .venv - In a directory called .venv
If we view the contents of the my-new-project directory
by using ls (for Windows) or ls -a (for MacOS
/Linux), we should see that there is now a .venv
sub-directory.
What should I call my virtual environment directory?
You can call the directory that contains the virtual environment
whatever you like, but the two conventional names are venv
and .venv.
The primary difference between these two is that the .
at the start of .venv indicates to MacOS and Linux-based
operating systems that this directory should be hidden when you view the
parent directory (i.e. my-new-project).
In this course I will default to .venv but you don’t
have to copy me.
Activating the new virtual environment
Now you’ve created the virtual environment you’re ready to start installing packages, right?
Not quite, the next step is activating the environment. This step effectively tells your operating system that it should be using the Python interpreter in your new virtual environment, rather than the one in the base environment. We’ll see why this is important later.
The command you use to do this will depend on the OS you are using:
Once you’ve done this you should see a prompt with name of you environment appear on the left of your console, e.g:
Now you are ready to start installing packages for your project.
Prompt name blues
If you called the directory you created your environment
.venv you’ll notice that the name of the environment
displayed in your console is the same. This isn’t very informative,
especially if you’re switching between multiple projects (are you sure
you’re installing that package in the right .venv?)
By defult this name is the same name you gave to the directory
contianing the virtual environment, so you could address this by giving
the directory a different name e.g.:
python -m venv my-new-project-venv, and this will be
reflected in the console:
However, this does mean you have to remember the name you gave to the virtual environment for each project. Not the end of the world, but a bit annoying.
--prompt to the rescue
Handily, venv gives you the option to customise the text
in the console for each project:
Which will set the virtual environment directory name to
venv, but also set the console prompt to
my-new-project:
You can even use the name of the current directory without having to type it out:
Deactivating the current virtual environment
Deactivating the currently activated virtual environment and returning to using the base environment is as simple as using the deactivate command:
If you want to reactivate the environment then just follow the steps to activate it, no need to create a new one.
Your Turn 1
Create a new project folder, create a new virtual environment inside
it, and activate that virtual environment.
Try and make sure to name your virtual environment something
memorable.
Using your Virtual Environment
Now you have a virtual environment set up for your project, let’s start using it.
Installing packages into the Virtual Environment
First let’s reactivate our virtual environment if it’s not already active:
Now we can install packages using pip as we would
usually, e.g:
Which will install the latest available version of the
emoji package to our environment.
You can check what is installed in your current environment by running:
Package Version
------- -------
emoji   2.14.0
pip     24.2
You should also verify that the code is accessible to you by starting
the Python interpreter (type python at the command line)
and then running the code below:
To exit the Python interpreter you can either type
exit() and press return, or use the keyboard shortcut
Ctrl/Cmd + D
Your turn 2
Try installing and using a different package
(e.g. numpy, pandas,
pillow).
Try using python -m pip list when your virtual environment
is activated to see if the package is available in your
environment.
What happens if you deactivate you environment and try and run the emoji
code above? Use python -m pip list to help you
investigate
The nuts and bolts of Virtual environments
At this point you may be wondering what is going on behind the scenes to make this all work. So, lets take a brief detour to give you an idea.
Peeking inside .venv
Lets start by looking in the .venv directory in your
project. The contents will be slightly different depending on your
operating system:
So, when you set up the virtual environment venv will
(amongst other things):
- create a copy of the Python interpreter (and pip) in the
.venv directory
- create a place where it can install packages, and
- setup some files that allow the virtual environment to be activated
and deactivated
But you now have (at least) two Python executables on your computer. How does you computer know which one to use within the virtual environment?
The path to Python
To explain this we need to introduce environmental variables, and
specifically the PATH environmental variable.
Environmental variables are values held by your Operating System which
tell the Operating System and installed programs how to behave.
One of the more common ones that you may come across is the
PATH variable which, in essence, is a is a list of places
that your computer will check for executables.
So, when you run python in the console your computer will
go through this list of places, get the location of the Python
executables on your system, and then run Python from the first place it
finds that executable.
You can see what directories are in your PATH variable
by running:
You can also see the locations of a specific executable on the
PATH by running:
Challenge
Run the above commands while your virtual environment is activated vs
deactivated.
What differences do you see in the PATH variable, and the
list of Python locations?
Pulling it together
The parts we’ve looked at in the last 2 sections give us a clearer idea of what Python is doing when you create and activate a virtual environment:
- You run
python -m venv .venv:- A directory called
.venvis created
- A standard directory structure is created within
.venv
- A copy of Python, pip, and the activate/deactivate files are put in
a sub-directory of
.venv(where will depend on your OS)
- A directory called
- You activate the virtual environment:
- The path to the
.venvdirectory is added to start of the system’sPATHenvironmental variable
- The path to the
site-packagesdirectory within.venvis added to thePYTHONPATHenvironmental variable- Not discussed in detail but this is how Python knows where to install/import packages
- The path to the
- You deactivate the virtual environment:
- The path to
.venvis removed from the start of the system’sPATHenvironmental variable
- The path to
site-packageswithin.venvis removed from thePYTHONPATHenvironmental variable
- The path to
- You can create, activate, and deactivate virtual environments using
the
venvpackage - You can installing packages in a virtual environment using
pip install, and view installed packages withpip list - Python and
venvcreate an directory on your computer that contains your virtual environment ( a separate Python interpreter and library) - Activating and deactivating the virtual environment modifies the
PATHandPYTHONPATHenvironmental variables to add/remove the path to the directory containing the virtual environment.
Content from Using venv and pip to capture a computational environment
Last updated on 2026-01-14 | Edit this page
Estimated time: 10 minutes
Overview
Questions
- How do I use
venvandpipto capture my computational environments?
Objectives
- How to specify specific versions of a package
- Recording packages installed in an environment
- Restoring packages to an environment
Now we’ve got the basics of how to use venv to create a
virtual environment and then install packages to it, let’s move onto
using these tools to record and restore the packages we install.
Specifying specific versions for a package
Before we start we have to address the question: What if we want to
install a specific version of a package for our project?
Currently we have been using the command
python -m pip install numpy, but by default this will
install the latest version of numpy.
Not particularly useful if we need to use anything other than the latest
version.
In this case we can use Version
Specifiers to tell pip exactly which version we want to
install.
Software Versioning is the practice of assigning an identifier to a particular release or state of a piece of software. This allows you to indicate what version of a particular bit of software you used to do something (e.g. execute code, run an analysis, etc.)
Semantic versioning
The primary versioning system used is called ‘Semantic Versioning’ and follows the
following pattern: Major.minor.patch
For example, the version of Python I am currently using is 3.12.1, so it
has: - a major version of 3,
- a minor version of 12, and
- a patch version of 1
Calendar versioning
An alternative, and lesser used system is called ‘Calendar versioning’ and follows the
following pattern: Year.month
For example, the latest release of the Ubuntu operating system is:
24.10, indicating it was released in October 2024.
For more details about software versioning see the FAIR4RS Packaging lesson
There are a whole range of different specifiers but the two most useful in this case are:
~=- Compatible release==- Version match
Compatible release
This matches any version of the package that is expected to be compatible with the version specified, e.g.:
~= 3.1will select version 3.1 or later, but not version 4.0 or later~= 3.1.2will select version 3.1 or later, but not version 3.2 or later
Version match
This matches a version of a package exactly, e.g.:
== 3.1will select version 3.1 (or 3.1.0), and no other version.== 3.1.*will select any version that starts with 3.1, and is equivalent to~= 3.1.0
So if you wanted to install the latest version of numpy
version 1 you could use either:
python -m pip install numpy~=1.0or
python -m pip install numpy==1.*Version specifier are also used when we record the packages we’ve used our project, which we’ll see next.
Recording the packages installed
So far, we’ve seen how virtual environments can be used to isolate the dependencies for each of our projects, but how do we ensure that this environment can be recreated?
We’ve used pip list to see the packages we’ve installed
before, so maybe we could use this and copy everything listed into a
file?
As with a previous solution, this would work, but is manual and may
be prone to errors so it is better to get the computer to do this for
you. Also, pip lists all the packages available in your
environment, not just the ones you installed, which is not ideal.
Luckily we have pip freeze. pip freeze will
output a list of packages with version specifiers for the packages you
installed in your virtual environment. These can then be written to a
file (conventionally called requirements.txt) that can then
be used to restore all the packages installed into a new
environment.
python -m pip freeze > requirements.txtThe > symbol here can be read as: ‘write the output
of the command on the left into the file on the right’ (instead of
displaying it on screen)
Note: pip will not automatically update
the requirements.txt file to include packages you install
after running pip freeze. So be sure to rerun it
periodically, and especially after you install new packages.
Challenge
Use pip freeze to record all the packages installed in
your virtual environment.
Take a look at the requirements.txt file generated. What do
you notice?
Now you have a file that has captured the packages used in your
computational environment, you can put it under version control
alongside your code.
This ensures that anyone who accesses your code can also recreate this
part of your computational environment.
Restoring an environment from a requirements.txt
file
Now recreating a project environment can be done in 3 steps:
Create a new environment
Activate the environment
Install the dependencies from
requirements.txt:python -m pip install --requirement requirements.txt
You should be familiar with how to do steps 1 and 2, and step 3 is a small modification to how you’d typically install packages.
The --requirement option tells pip that you
are installing the packages from a file and to look in the file for the
specific package names and versions.
This can be shortened to just -r.
Challenge
Here is a requirements.txt file
from one of my projects.
I’d like you to download it, and follow the steps above to recreate the
computational environment.
(You may have to right click and select “Save file as…”)
What packages (names and versions) did I have installed in this
environment?
Can you recreate this level of my computational environment?
- Package versions can be specified by using the semantic versioning syntax (or, less commonly, the calendar versioning syntax).
-
pip freezecan be used to get a list of installed packages, and these can be written to a file. - Packages can be restored from a file produced by
pip freezeby using the--requirementoption withpip install.
Content from Limitations
Last updated on 2026-01-14 | Edit this page
Estimated time: 10 minutes
Overview
Questions
- What are the limitations of
venv? - What are the limitations of virtual environments more generally?
Objectives
- Understand the limitations of using
venvand some alternatives - Understand the inherent limitations of virtual environments, and potential solutions for them
Specific limitations of venv
While venv is a relatively simple option for setting up
and managing your virtual environments it does have some key
limitations:
- Python version management
- Automatically keeping track of installed packages
1. Python version management
There are differences between the different versions of Python. With the most extreme example being the incompatibility between Python 2 and Python 3. Depending on the complexity of your code, changes between version may not affect you, but it can be hard to tell without trying a newer version. If you want to make your code truly reproducible you should include some information about which version of Python you used to produce your results.
venv uses whichever version(s) of Python you have
installed on your machine, but neither venv or
pip records information about which version of Python you
are using.
It is, of course, possible to include this information with the instructions on how to run your code, but as highlighted multiple times it is better to have an automated solution.
2. Automatically keeping track of installed packages
As shown, using venv with pip can create a
list of dependencies for your project, but this has to be created
manually and updated manually whenever you modify the dependencies for
your project.
Ideally this would be updated automatically as packages are added and removed, so as to avoid any mistakes or forgetting to update it after changes have been made.
Solutions
There are quite a few different tools that have been developed to
deal with these issues. Out of these the ones available, I have found
most useful to be uv and conda/ miniforge/
pixi.
These tools combine package, environment, and Python version
management, allowing you to do everything that pip and
venv do, while also being able to easily switch between
different Python versions. Both will also record the version of Python
used within an environment allowing you to capture both the ‘package’
and ‘language’ layers of your computational environment in one go.
There are some differences between them though:
uv:
- Built as a replacement for pip and
venv
- Uses the same package repositories as pip
- Uses the same virtual environment structure as venv
- Auto updating of environment dependencies file (equivalent to
requirements.txt)
- Noticeably faster for installing packages than pip or
conda
- Not reached a version 1 release (yet!)
conda/miniforge/pixi:
- Provide pre-compiled binaries for packages, which means faster
installation
- Includes other languages (notably R)
- They use their own package repositories, so may not be inter-operable
with other Python tools without a bit of fiddling
- They use their own virtual environment structure that is different
from the one explained here
For a broader discussion of the tooling available for Python version/package/environment management have a look at these two blog posts:
Python Environment Jungle: Finding My Perfect Workflow
An unbiased evaluation of environment management and packaging tools
James Thomas has tutorials
for both uv and pixi
Prior to 2025 I primarily used either pip and
venv or conda to manage my Python
environments. However, for all new Python projects since the start of
2025 I have used uv and will continue to do so wherever
possible. I haven’t used pixi at all.
Once you feel comfortable with the concepts discussed in this
material I would suggest giving uv a try, although
ultimately the best tool for this is the one that suits your workflow
best.
General limitations of virtual environments
Beyond the specific limitations of venv, virtual
environments in general have one key limitation:
- They are not able to control the underlying system they are working within.
If we go back to our diagram showing the different layers of your computational environment, you can see that virtual environments only address the layer of the environment immediately below your code.
If you are using something like conda,
miniforge or uv, then you may be able to
extend that to the ‘language’ layer. But these tools are not able to
capture the ‘operating system’ layer.
Depending on the degree of computational reproducibility you are looking for, capturing the ‘package’ and ‘language’ layers may be enough. However, if you are looking for byte-for-byte reproducibility you will likely also want to capture as much of the computational environment as possible, and so you will need to turn to other tools.
Capturing the operating system layer
There are multiple different tools that can be used to capture the layer below ‘package’/ ‘language’
Virtual machines
This is one of the more commonly known tools for capturing and
replicating the ‘Operating System’ layer a computational environment.
Virtual machines (VMs) are effectively an emulation or virtualisation of
an operating within your own “host” operating system. For example, using
a virtual machine I can create and run a Windows XP operating system
within my Windows 10 machine. These can also be interacted with using
familiar point and click interfaces, and can be customised to access a
specific portion of the host machines CPU, memory, disk, etc.
It is possible to take a snapshot of an exiting VM for distribution, or
use an ‘Infrastructure
as code’ tool such as Ansible to
write a script to (re)create a specific environment (e.g. install
specific software, etc)
Containers
Containers are similar to Virtual machines in that they virtualise an
operating system, but containers are typically more lightweight than VMs
as they only contain software and files that are explicitly defined in
order to run the project contained within them.
They also typically don’t have a GUI in the same way the OS on your
computer does (although some containers will provide an interface,
e.g. RStudio Server).
If you want to create an environment on your machine and then run it on
something more powerful (like a HPC) then containers are a good way of
achieving this, although this can become complex due to limited
permissions and/or underlying hardware.
Andy Turner of the EPCC has an excellent course providing an introduction to using containers for reproducible computational environments.
Nix/Guix
Nix(OS) and Guix also provide a way of capturing the
computational environment below the ‘packages’ and ‘language’ layers,
but take a slightly different approach to this than VMs and
Containers.
These are package managers based on the idea declarative configurations,
that is: “specify your setup with a programmable configuration file, and
then let the package manager arrange for the software available on the
system to reflect that”.
This is similar to what pip is doing with the
requirements.txt file described previously, but for an
entire Operating system. However, this approach takes it one step
further by allowing multiple versions of the same package to exist on a
machine simultaneously.
For a more complete outline of this approach see this post
-
pipandvenvprovide the most basic functionality for capturing this level of your computational environment. - Other tools (e.g.
uv,pixi) are available that build on this basic functionality that would be worth investigating and incorporating. - Virtual environments can only capture a portion of the computational environment.
- Projects that require more of the computational environment to be captured may need more advanced tools (e.g. VMs, containers, Nix/Guix) to achieve this.