

All in One View
Content from Software Packaging
Last updated on 2026-07-14 | Edit this page
Estimated time: 12 minutes
Overview
Questions
- What is software packaging?
- How is packaging related to reproducibility and the FAIR4RS principles?
- What does packaging a Python project look like?
Objectives
- Recognise the importance of software packaging to ensure reproducibility.
- Understand what are the basic building blocks of a Python package.
Introduction
One of the most challenging aspects of research is reproducibility. This necessitates the need to ensure that both research data and research software adhere to a set of guidelines that better enable open research practices across all disciplines. The recent adaptation of the original FAIR principles (Findable, Accessible, Interoperable, Reusable) means that research software can now also benefit from the same general framework as research data, whilst accounting for their inherent differences, including software versioning, dependency management, writing documentation, and choosing an appropriate license. This is commonly referred to as the FAIR4RS principles.
Can you recall a time when you have used someone else’s software but encountered difficulties in reproducing their results? What challenges did you face and how did you overcome them?
Software packaging is one of the core elements of reproducible
research software. In general, software packaging
encompasses the process of collecting and configuring software
components into a format that can be easily deployed on different
computing environments.
Think about what a package is in general; you typically
have a box of items that you want to post to someone else in the world.
But before you post it for others to use, you need to make sure the
package has things like: an address label, an instruction manual, and
protective material.
Challenge 1: Packaging Analogy
Using the analogy in the callout above, provide an example for each package attribute in terms of the software attribute.
The above callout should help you think about a few different possible analogies.
Box of items: The software itself (source code, data, images).
Address label: Installation instructions specifying the target system requirements (operating system, hardware compatibility).
Instruction manual: User documentation explaining how to use the software effectively.
Protective materials: Error handling routines, data validation checks to safeguard the software from misuse or unexpected situations.
Why Should You Package Your Software?
As we’ve touched on above, there are several benefits to packaging your software:
Ease of installation: Instead of manually copying individual files and setting configurations, users can install the collective package using a package manager with very few steps involved.
Standardisation: Packaging enforces a standard structure and format for software, making it easier for users and developers to understand.
Research impact and collaboration: From a research impact perspective, software packaging ensures reproducibility, accessibility, and ease of dissemination to the wider research community.
If you decide that packaging your software is right for your project, there are some important questions that you, as the developer, should consider before getting started:
Target Users: Who are you building this package for? Beginners, experienced users, or a specific domain? This will influence the level of detail needed in the documentation and the complexity of dependencies you may need to include.
Dependencies: What other Python libraries does your package rely on to function? What about hardware dependencies? Finding the right balance between including everything a user may need and keeping the package lightweight is important.
Testability: How will users test your package? You should consider including unit tests and examples to demonstrate usage and ensure your code functions as expected.
Scalability: As your project and software grows in size and complexity, how can you effectively handle the increased modules, dependencies and distribution requirements?
Of course, this is not an exhaustive list, however, once you have thought about candidate solutions for these questions, you’re in a good position to start packaging your software.
Packaging in Python
The most basic directory structure of a Python package looks something like:
📦 my_project/
├── 📂 my_package/
│   └── 📄 my_code.py
│   └── 📄 __init__.py
└── 📄 pyproject.toml

where

- 📦 `my_project/` is the root directory of the project.
- 📂 `my_package/` is the package directory containing the source code.
- 📄 `pyproject.toml` is a configuation file for setting up the package, containing basic metadata.
Tools such as setuptools and pip use the
pyproject.toml file to configure how the package is built,
distributed, and installed. We’ll cover pyproject.toml in
more depth in the next couple of episodes.
At this point, it’s worth discussing the use of the
__init__.py file. The __init__.py script is
used to mark a directory as a Python package (different to a sotware
package), allowing the contained modules to be imported (note; the use
of double under lines in Python, often abbreviated to
dunder lines, signal that this script should be “hidden”
from users, helping distinguish this script from others). It also
contains any initialisation code for the package For instance, consider
the times you have imported a package, such as numpy. The ability to write:
is enabled by the modular structuring of the numpy package. This
includes presence of the __init__.py file, which signals to
Python that the directory is a package, allowing to import its content
using the import statement. The complete
import numpy statement then means Python searches for the
numpy package in its search path (sys.path)
and loads its contents into the namespace under the name
numpy. Packages that follow the folder structure above are
often referred to as regular packages.
However, in Python versions >= 3.3, the concept of
implicit namespace packages (see PEP 420) was introduced.
Namespace packages are commonly used to split a regular Python package
(as described above) across multiple directories, which ultimately means
the __init__.py file is technically not required to create
any Python package. For the purposes of this course, we will use an
__init__.py to keep with convention and avoid complications
with namespace packages.
Challenge 2: Improving your project’s packaging
The directory structure of the basic Python package shown above is a good starting point, but it can be improved. From what you have learned so far, what other files and folders could you include in your package to provide better organisation, readability, and compatibility?
Use the emoji folder structure above to get you started.
A possible improvement could be to include the following to your package:
📦 my_project/
├── 📂 my_package/
├── 📂 tests/
├── 📄 pyproject.toml
├── 📄 README.md
└── 📄 LICENSE
The most obvious way to improve the package structure is to include a
series of unit tests in a tests directory to demonstrate
usage and ensure your code functions as expected. The main benefit of a
README.md file is to provide essential information and
guidance about a project to users, contributors, and maintainers in a
concise and easily accessible format. Similarly, the purpose of a
LICENSE.md file is to specify the licensing terms and
conditions under which the package’s code and associated assets are made
available to others for use, modification, and distribution.
Although we have touched on the core concepts of packaging in Python,
including how to set up one using the pyproject.toml
configuration file, we still need to learn about how to write the
metadata and logic for building a package. The next episode of this
course provides a brief overview of the history of Python packaging, and
what is required to turn your own project into a package.
Reproducibility is an integral concept in the FAIR4RS principles. Appropriate software packaging is one way to account for reproducible research software, which involves collecting and configuring software components into a format deployable across different computer systems.
Software packaging is akin to the packaging a box for shipment. Attributes such as the software source code, installation instructions, user documentation, and test scripts all support to ensure reproducibility.
The purpose of a software package is to install source code for execution on various systems, with considerations including target users, dependencies, testability and scalability.
Content from Package File History
Last updated on 2026-07-14 | Edit this page
Estimated time: 11 minutes
Overview
Questions
- What is required to turn your Python project into a package?
- Why are there so many file types you can use to create packages in Python?
- Which file type is the most appropriate for my project?
Objectives
- Learn the difference between a python project and package
- Understand the prerequisites for turning your project into a package
- Explain the different ways of creating a Python Package
- Understand the shortfalls of the previous packaging standards
Introduction
In this episode we are going to look at what turns your project of python code into a Python package. Throughout Pythons development there have been many different ways of doing this, we will aim to explore some of these. This is to both build an understanding of why the current standard is what it is and to have some context if you ever come across the other methods when looking at other projects.
What Python packaging files exist?
- requirements.txt
- setup.py
- pyproject.toml
Requirements.txt
A requirements.txt is a text file where each line
represents a package or library that your project depends on. A package
managing tool like PIP can use this file to install all the necessary
dependencies.
While a requirements.txt file isn’t normally directly used for packaging, its a simple and common filetype that offers some of the features that the packaging files do.
requests==2.26.0
numpy>=1.21.0
matplotlib<4.0
Setup.py
Before the introduction of pyproject.toml the main tool
supported for installing packages was setup.py. As the
extension suggests a setup.py is a python file where the
metadata and logic for building your package are contained.
Setup.py problems
Q: Discuss with each other what problems if any you think there may be with using a python file to create python packages
Think about the differences between a code file and a text file
- As
setup.pyis a code file, there is a potential for malicious code to be hidden in them if the file comes from an untrusted source - There is quite a bit of ‘boilerplate’ in each file
- The syntax has to be precise and may be confusing to those not familiar with Python
Pyproject.toml
Introduced in PEP517,
the latest file for packaging a python project is the
pyproject.toml file. Like a .cfg file, a
toml file is designed to be easy to read and declarative.
It is the current recommended way to package your Python
TOML stands for Tom’s Obvious Minimal Language!
When originally introduced, the pyproject.toml file
aimed to replace setup.py as the place to declare build
system dependencies. For example the most basic
pyproject.toml would look like this.
TOML
[build-system]
# Minimum requirements for the build system to execute.
requires = ["setuptools", "wheel"]
Project metadata however was still being specified either in a
setup.py or a setup.cfg, the latter being
preferred.
With the introduction of PEP621 in 2020, project
metadata could also be stored in the pyproject.toml files,
meaning you only now need the single file to specify all the build
requirements and metadata required for your package! This is still the
preferred way in the community.
We will be going into how to make a pyproject.toml file
in more detail in one of the next episodes.
TOML
#Build system information
[build-system]
requires = ["setuptools", "wheel"]

#Project Metadata
[project]
name = "my_cool_package"
version = "0.0.0"
description = "A package to do awesome things"
dependencies = ["pandas", "numpy"]

#Config for an external tool
[tool.black]
line-length = 98- Python packages make code easier to install, reuse and maintain.
- A single pyproject.toml file is all that is required to package your Python project.
- There are multiple standards out there for Python packaging, but pyproject.toml is the current recommended way.
Content from Accessing Packages
Last updated on 2026-07-14 | Edit this page
Estimated time: 32 minutes
Overview
Questions
- What are the different ways of downloading Python packages?
- What are package managers?
- How can I access my own package?
Objectives
- Learn about package managers such as PIP
- Install packages using PIP
- Install packages from source
Introduction
Due to Python’s popularity as a language, it is quite likely that you won’t be the first person to set off on solving any particular task. Many others have worked on common problems and then shared their solution in the form of a package, which you can conveniently integrate into your own code and use!
Popular Packages
Some of the most popular packages you may have heard of are:
- Numpy
- Pandas
- Tensorflow
- Matplotlib
- Requests
To use a package that is installed you use the key word
import in Python.
Python Package Index (PyPI)
The Python Package Index or PyPI is an online repository of Python packages hosting over 500,000 packages! While there are alternatives such as conda-forge, PyPI is by far the most commonly used and likely to have all you need.
Exercise 1: Explore PyPI
Explore PyPI to get familiar with it, try searching for packages that are relevant to your research domain / role!
pip
pip (package installer for Python) is the standard tool for installing packages from PyPI. You can think of PyPI being the supermarket full of packages and pip being the delivery van bringing it to you.
Using pip
pip itself is a Python package that can be found on PyPI. It however comes preinstalled with most Python installations, for example python.org and inside virtual environments.
The most common way to use pip is from the command line. At the top of a package page on PyPI will be the example line you need to install the package
python -m pip install numpyThe above will install numpy from PyPI, a popular scientific computing package enabling a wide range of mathematical and scientific functions.
You may notice a wheel file download during the pip install, for
example Downloading numpy-2.0.0-cp312-cp312-win_amd64.whl.
A wheel in Python is a prebuilt package format that allows for quicker
and more efficient installation, so when it is downloaded your local
computer doesn’t need to do any building. The alternative is source
files which often take the form .zip or
.tar.gz, which when downloaded will then need to be built
then installed, which is often far slower.
Exercise 2: Create venv and install Numpy
Step 1: Create a venv in the .venv directory using the command
python -m venv .venv and activate it with
When activated you should see the name of your environment in brackets at the start of your terminal line
Step 2: Install Numpy into your new environment
Step 3: Check your results with python -m pip list
Step 4: Deactivate your environment with deactivate
Check out this documentation or the FAIR4RS course on virtual environments to learn more!
pip can also be used to install packages from source. This means that
the package file structure (source) is on your local computer and pip
installs it using the instructions from the setup.py or
pyproject.toml file. This is especially handy for packages
either not on PyPI, like ones downloaded from github, or for your own
packages you’re developing.
It may be worth checking with the class at this point that they are all familiar with the -m notation, and what the above command does exactly
Here the . means to install your current directory as a
Python package. For this to work the directory your command line
interface is currently in needs to have a packaging file,
i.e. setup.py or pyproject.toml.
- pip is the most common tool used to download and access python packages from PyPI.
- PyPI is an online package repository which users can choose to upload their packages to for others to use.
- pip can also be used to install packages on your local system (installing from source)
Content from Creating Packages
Last updated on 2026-07-14 | Edit this page
Estimated time: 12 minutes
Overview
Questions
- Where do I start if I want to make a Python package?
- What will I need / want in my package?
- What’s considered good practice with packaging?
Objectives
- Create and build a basic example Python package
- Understand all the parts and decisions in making the package
Introduction
This episode will see us creating our own Python project from scratch and installing it into a Python virtual environment ready for use. Feel free if you’re feeling adventurous to create your own package content or follow along with this example of a Fibonacci counter.
Fibonacci Counter
This package will allow a user to find any value from the Fibonacci
sequence. The Fibonacci sequence is a series of whole numbers where each
number is the sum of the two previous numbers. The first 8 numbers of
the sequence are 0, 1, 1, 2, 3, 5, 8, 13.
Reinventing the wheel
It is good to ask yourself if the package or features you are designing have been done before. Obviously we have chosen a simple function as the focus of this episode is on packaging code rather than developing novel code.
Creating the package contents
In this section we will go through creating everything required for the package.
What files and content go into a package?
Think back to the earlier episodes and try to recall all the things that can go into a package.
- Python Module - This is the directory with the Python code that does the work.
- Configuration File - e.g. your pyproject.toml file
- Other metadata files - e.g. LICENCE, README.md, citation.cff
In this episode we will only be creating a minimal example so many of
the files you have thought of won’t be included. Next we will be
creating our directory structure. In either your documents
folder if you are on Windows or your home directory if you
are on macOS or Linux, create a folder called
fibonnaci_uos_name
📦 fibonacci_uos_name/
├── 📂 fibonacci_uos_name/
│   └── 📄 sequence.py
│   └── 📄 __init__.py
└── 📄 pyproject.toml
The first thing we will do in this project is create the Python module (the actual code!).
Creating Python module
- Create a Python file called
sequence.pyas shown in the structure above. - Add the following code which contains a function that returns the Fibonacci sequence
Using your Python module
With your Python environment activate, launch Python and test importing and using your package.
1. Navigate to a different directory to ensure you are importing the package not the local directory
2. Launch Python and import package
or
Configuration File
In this section we are going to look deeper into the
pyproject.toml. Sections in a .toml file are
called tables. In a pyproject.toml file there are 2 tables
required for a minimum working pyproject.toml: a
[build-system] table and a [project] table.
Take a look at the minimum example pyproject.toml
below.
TOML
[build-system]
requires = ["setuptools"]


[project]
name = "fibonacci_uos_name"
version = "0.1.0"
description = "A package to calculate the fibonacci sequence"
dependencies = ["pandas", "numpy"]
[build-system]
The [build-system] table specifies information required
to build your project directory into a package. The main key in this
table is requires, this key states what build tool(s)
should be used to do this building. There are multiple popular build
tools that can be used to build your project, in this tutorial we
will use setuptools, as it is simple and very popular.
[project]
The [project] table is where your package’s core
metadata is declared.
pyproject.toml documentation
The full list of accepted keys can be found here in the documentation
Create your configuration file
Create a pyproject.toml file with the two required
tables. In the [project] table include the following
keys:
- name
- version
- description
- authors
- keywords
Running python -m pip install . will install your
package. Just ensure your terminal’s working directory is the same as
the pyproject.toml file!
Project & Packaging Naming
Referring back to the project structure:
📦 my_project/
├── 📂 my_package/
│   └── 📄 my_code.py
│   └── 📄 __init__.py
└── 📄 pyproject.toml
The name of your package directory is the name that users will import when they use the package
PyPI which we looked at in the accessing packages episode and other tools like build which we cover later, use the project name specified in your pyproject.toml. It is common to keep these names consistent, so the package name the user installs is the same that is used to import the package.
Editable Install
When installing your own package locally, there is an option called
editable or -e for short.
python -m pip install -e .
With a default installation (without -e), any changes to your source package will only appear in your Python environment when your package is rebuilt and reinstalled. The editable option allows for quick development of a package by removing that need to be reinstalled, for this reason it is sometimes called development mode!
- A package can be built with as little as 2 files, a Python script and a configuration file
- pyproject.toml files have 2 key tables, [build-system] and [project]
- Editable installs allow for quick and easy package development
Content from Versioning
Last updated on 2026-07-14 | Edit this page
Estimated time: 12 minutes
Overview
Questions
- Why is versioning essential in software development? What problems can arise if versioning is not properly managed?
- How can automation tools, such as those for version bumping, improve the software development process?
- Why is it important to maintain consistency and transparency in software releases?
Objectives
- Explain why versioning is crucial for software development, particularly in maintaining reproducibility and ensuring consistent behaviour of the code after changes.
- Understand how to use
setuptools_scmfor automating version bumping in Python projects.
Introduction
In previous episodes, we developed a basic Python package to demonstrate the importance of software reproducibility. However, a crucial question that we haven’t addressed yet is: how can we, as the developers, ensure that a change in our package’s source code does not result in the code failing or behaving incorrectly? This is also an important consideration for when you are releasing your package.
One of the pitfalls of packaging is to fall into poor naming
conventions, even for scripts. For instance, how many times have you
worked on scripts that was named my_script_v1.py or
my_script_final_version.py? What were your main challenges
with this approach, and what alternative solutions can you think of to
circumvent this naive approach?
Semantic Versioning
The answer the question above is based on a concept called
versioning. Versioning is the practice of assigning unique
version numbers to different states or releases of a given package to
track its development, improvements, and bug fixes over time. The most
popular approach for Python packaging is to use the Semantic Versioning framework, and can be
summarised as follows:
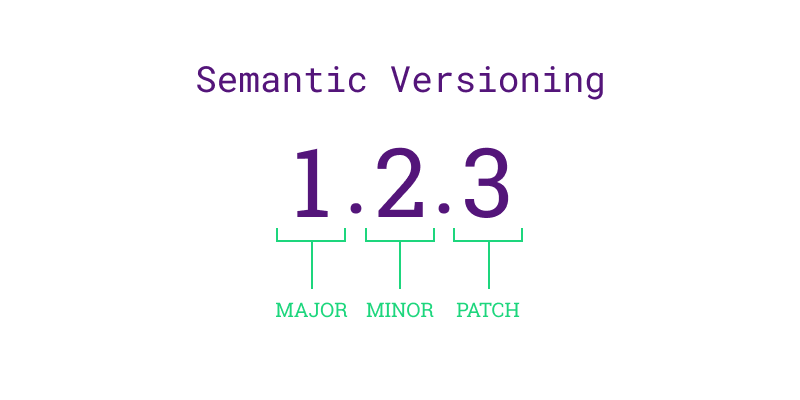
Given a version number X.Y.Z, where X is the major version, Y is the minor version and Z is the patch version, you increment:

X when you make incompatible API changes,

Y when you add functionality in a backwards compatible manner,

Z when you make backwards compatible bug fixes.
Recall: API
An Application Programming Interface (API) is the name given to the way different programs or parts of a program to communicate with each other. It provides a set of functions, methods that can be used to interact with a piece of software or data services. Commonly, APIs are used within web-based applications to enable users to receive information from a given service, such as logging into social media accounts, creating weather widgets, or finding geographical locations.
The first version of any package typically starts at 0.1.0, and any
changes following the semantic versioning rules above results in an
increment to the appropriate version numbers. For example, updating a
software from version (0.1.0) to (1.0.0) is called a
major release. Version (1.0.0) is commonly
referred to as the first stable release of the package.
An important point to highlight is the semantic versioning guidance above is a general rule of thumb. Exactly when you decide to bump the versions of your package is dependent on you, as the developer, to be able to make that decision. Developers typically take the size of the project into account as a factor; for example, small packages may require a patch release for every individual bug that is fixed. On the other hand, larger packages often group multiple bug fixes into a single patch release to help with tractability because making a release for every fix would accumulate in a myriad of releases, which can be confusing for users and other developers. The table below shows 3 examples of major, minor and patch releases developers made for Python.
| Release Type | Version Change | Description |
|---|---|---|
| Major Release | 2.0.0 to 3.0.0 | Introduced significant and incompatible changes, such as the print function and new syntax. |
| Minor Release | 3.7.0 to 3.8.0 | Added new features like the walrus operator and positional-only parameters, backward-compatible. |
| Patch Release | 3.8.0 to 3.8.1 | Fixed bugs and made performance improvements without adding new features or breaking changes. |
Pre-release Versions
Pre-release versions in semantic versioning are versions of the software that are still in development or testing before a stable release. They are denoted by appending a hyphen and a series of dot-separated identifiers to the version number, such as 1.0.0-alpha or 1.0.0-beta.1. These versions allow developers to release early versions for testing and feedback while clearly indicating their status.
Once we publicly release a version of our software, it is crucial to maintain consistency and avoid altering it retroactively. Any necessary fixes needs to be addressed through subsequent releases, typically indicated by an increment in the patch number. For instance, Python 2 reached its final version, 2.7.18, in 2020, more than a decade after the release of Python 3.0. If the developers decided to discontinue support for an older version, leaving vulnerabilities unresolved, they would have to transparently communicate this to their users and encourage them to upgrade.
Challenge 1: Semantic Versioning Decision Making
Imagine you are a developer working on a Python library called
DataTools, which provides various utilities for data
manipulation. The library uses semantic versioning and is currently at
version 1.2.3. You have implemented a new feature that adds support for
reading and writing CSV files with custom delimiters.
According to semantic versioning, should you bump the version to
1.3.0, 1.2.4, or 2.0.0? Explain
your reasoning.
Think about whether the new feature introduces any breaking changes for existing users.
According to semantic versioning, since the new feature adds
functionality in a backward-compatible manner, the version should be
bumped to 1.3.0. This signifies a minor version
increase.
Versioning vs Version Control
Note; although they share similarities, you should not confuse software versioning and version controlling your software. The table below outlines some similarities and differences to help you differentiate them:
| Aspect | Version Control | Versioning |
|---|---|---|
| Purpose | Tracking changes, enhancing collaboration, and maintaining a history of revisions | Differentiating between various stages of software development or releases, ensuring clear identification of updates and changes |
| Features | Branching, conflict resolution, merging | Version numbering, compatibility guidelines, and release notes |
| Example | Git | Semantic Versioning |
| Benefits | Collaboration, code integrity, and project management | Communication of changes (major, minor, patch), transparency, and compatibility |
| Challenges | Managing conflicts and merges with multiple contributors, ensuring training for teams, and integrating within existing processes | Ensuring backward compatibility and avoiding confusion with version numbers that accurately reflect the changes |
Dynamic Versioning using setuptools_scm
At this point, you might be thinking; “Do I have to manually
update the version number everywhere every release?”
Thankfully, the answer is no. Often, the version number associated to
your package will typically be in multiple locations within your
project, for example, in your .toml file and separately in
your documentation. This means that manually updating every location for
every release you have can be extremely cumbersome and prone to
human-error, and therefore, you should avoid manually updating your
versions. Fortunately, the setuptools library we looked at
in previous episodes can help us automate these tasks.
The most natural and simplest solution is to use setuptools_scm
(abbreviated as Setuptools Semantic Versioning), which is an extension
of the setuptools library. setuptools_scm
simplifies versioning by dynamically generating version numbers based on
your version control system (e.g. git). It can extract
Python package versions using git metadata instead of
having to manually declare them yourself.
There are 3 changes to your pyproject.toml file required
to get your project to build using the version number from the git tag
instead of the manual version value:
- Add setuptools-scm to the required packages
- Replace the manual version with a dynamic one
- Add the setuptools.scm table header to instruct the build process to use setuptools-scm
TOML
[build-system]
requires = ["setuptools", "setuptools-scm"]


[project]
name = "fibonacci_uos_name"
description = "A package to calculate the fibonacci sequence"
dependencies = ["pandas", "numpy"]
dynamic = ["version"]

[tool.setuptools_scm]
Once you’ve set up setuptools_scm in your
pyproject.toml file, the workflow to version bump your
package will look like:
-
Commit your changes:
-
Add your changes and commit them in your Git repository.
-
-
Tag a new version:
-
Create a new Git tag to bump the version (e.g., from
v1.0.0tov1.1.0):
-
- Push the tag to your remote repo (e.g. GitHub):
-
Push the new tag to your remote Git repository if applicable:
-
Rebuild/reinstall your package:
-
When you build or install the package,
setuptools-scmwill automatically pick up the new version from the Git tag.Following this, you can confirm your new version by printing your package’s
__version__attribute. Ultimately, this means that your package’s Git tags,__version__,pyproject.tomland any other file containing your package version version will automatically updated and synchronised with each other. So when users or other developers are using your framework, they’re able to accurately tracking any code changes and dependencies, allowing them to reliably recreate specific versions of your software at any point in time.
-
Although setuptool_scm is the most common and simplest
tool for dynamic versioning, there are many alternatives that you may
consider in your own project. These include:
PDM - this is a Python package and dependency manager, which also supports the latest PEP standards.
Hatch - used for managing and publishing Python projects, and handling virtual environments and versioning. It’s also best suited for multi-environment and cross-version testing setups.
Rye - a lightweight Python project manager designed to simplify dependency management and virtual environments. This is generally ideal for users looking for a streamlined workflow.
Versioning is crucial for tracking the development, improvements, and bug fixes of a software package over time. It ensures that changes are documented and managed systematically, aiding in reproducibility and reliability of the software.
Tools like
setuptools_scmhelp automate the version bumping process, reducing manual errors and ensuring that version numbers are updated consistently across all project files.Versioning enables users to track code changes and dependencies, allowing reliable recreation of specific software versions, and further aiding the reproducibility of your software.
Content from Releasing Python Packages
Last updated on 2026-07-14 | Edit this page
Estimated time: 12 minutes
Overview
Questions
What does releasing software mean?
How can you prepare your software for releasing and publishing on different platforms?
Objectives
Understand the significance of releasing and publishing your software in the context of FAIR4RS.
Learn what other files and data can be released alongside the software.
Preparing to Publish
Now that we have covered the fundamentals of packaging in Python, we can start preparing to publish the package online for others to use. But before we do, we need to make sure our package contains the necessary files. To recap, let’s review the basic directory we created back in episode one, which had the following structure:
📦 my_project/
├── 📂 my_package/
│ └── 📄 init.py
├── 📂 tests/
├── 📂 docs/
│ └── 📄 documentation.md
├── 📄 pyproject.toml
├── 📄 README.md
└── 📄 LICENSE
README
Firstly, all packages must contain a README.md file that
explains what the project is. how users can install it and how they can
use it. A good example of a README.md file may look
something like:
# My Python Project

My Python Project is a simple utility tool designed to perform basic operations on text files. Whether you need to count words, find specific phrases, or extract data, this tool has you covered.

## Installation

You can install My Python Project via pip:

$ pip install my-python-project

## Usage

from my_python_project import text_utils

text = "Lorem ipsum dolor sit amet, consectetur adipiscing elit."
word_count = text_utils.count_words(text)
print("Word count:", word_count)

This will output:

Word count: 9
Notice that the README.md should be included at the top
level of our project directory. If your package was created using a
.toml file, it should also be included in the metadata by
adding in the following line:
In the README.md file, developers also usually include
in a “contributing” section for new users that are typically outside of
the project. The purpose of this section is to encourage new developers
to work on the project, while ensuring they follow the etiquette set by
the project developers. This may look something like:
### Contributing

Contributions to My Python Project are welcome! If you'd like to contribute, please follow these steps:

1. Fork the repository.
2. Create a new branch for your feature (git checkout -b feature/new-feature).
3. Make your changes and ensure tests pass.
4. Commit your changes (git commit -am 'Add new feature').
5. Push to the branch (git push origin feature/new-feature).
6. Create a new Pull Request.
Licensing
Following this, it is essential for your software to have a license to emphasise to users what their rights are in regards to usage and redistribution. The purpose of this is to provide the developer with some legal protections, if needed. There are many different open source licenses available, and it is up to the developer(s) to choose the appropriate license. You can explore alternative open source licenses at www.choosealicense.com. It is important to note that your selection of license may be constrained by the licenses of your dependencies.
The most common license used in open source projects is the MIT license. The MIT license is permissive, which allows users to freely use, modify, and distribute software while providing a disclaimer of liability.
The MIT License has the following terms:
Copyright (c)
Permission is hereby granted, free of charge, to any person obtaining a copy of this software and associated documentation files (the “Software”), to deal in the Software without restriction, including without limitation the rights to use, copy, modify, merge, publish, distribute, sublicense, and/or sell copies of the Software, and to permit persons to whom the Software is furnished to do so, subject to the following conditions:
The above copyright notice and this permission notice shall be included in all copies or substantial portions of the Software.
THE SOFTWARE IS PROVIDED “AS IS”, WITHOUT WARRANTY OF ANY KIND, EXPRESS OR IMPLIED, INCLUDING BUT NOT LIMITED TO THE WARRANTIES OF MERCHANTABILITY, FITNESS FOR A PARTICULAR PURPOSE AND NONINFRINGEMENT. IN NO EVENT SHALL THE AUTHORS OR COPYRIGHT HOLDERS BE LIABLE FOR ANY CLAIM, DAMAGES OR OTHER LIABILITY, WHETHER IN AN ACTION OF CONTRACT, TORT OR OTHERWISE, ARISING FROM, OUT OF OR IN CONNECTION WITH THE SOFTWARE OR THE USE OR OTHER DEALINGS IN THE SOFTWARE.
As with the README.md, you can also add the license to
your pyproject.toml file as:
Creating Releases of your Software
Once you have prepared all of the material above, you will be in a
good position to release your software to an online repository. The most
common platform to host your software packages is on GitHub, which uses
git as the underlying tool to version control your code
(note; alternatives are GitLab, BitBucket and SourceForge).
While the terms releasing and publishing
are commonly used interchangeably, in this course,
releasing refers to making a version of the software
available for download and use, whereas publishing refers
to the formal announcement and distribution of the software to a wider
audience on a platform or marketplace.
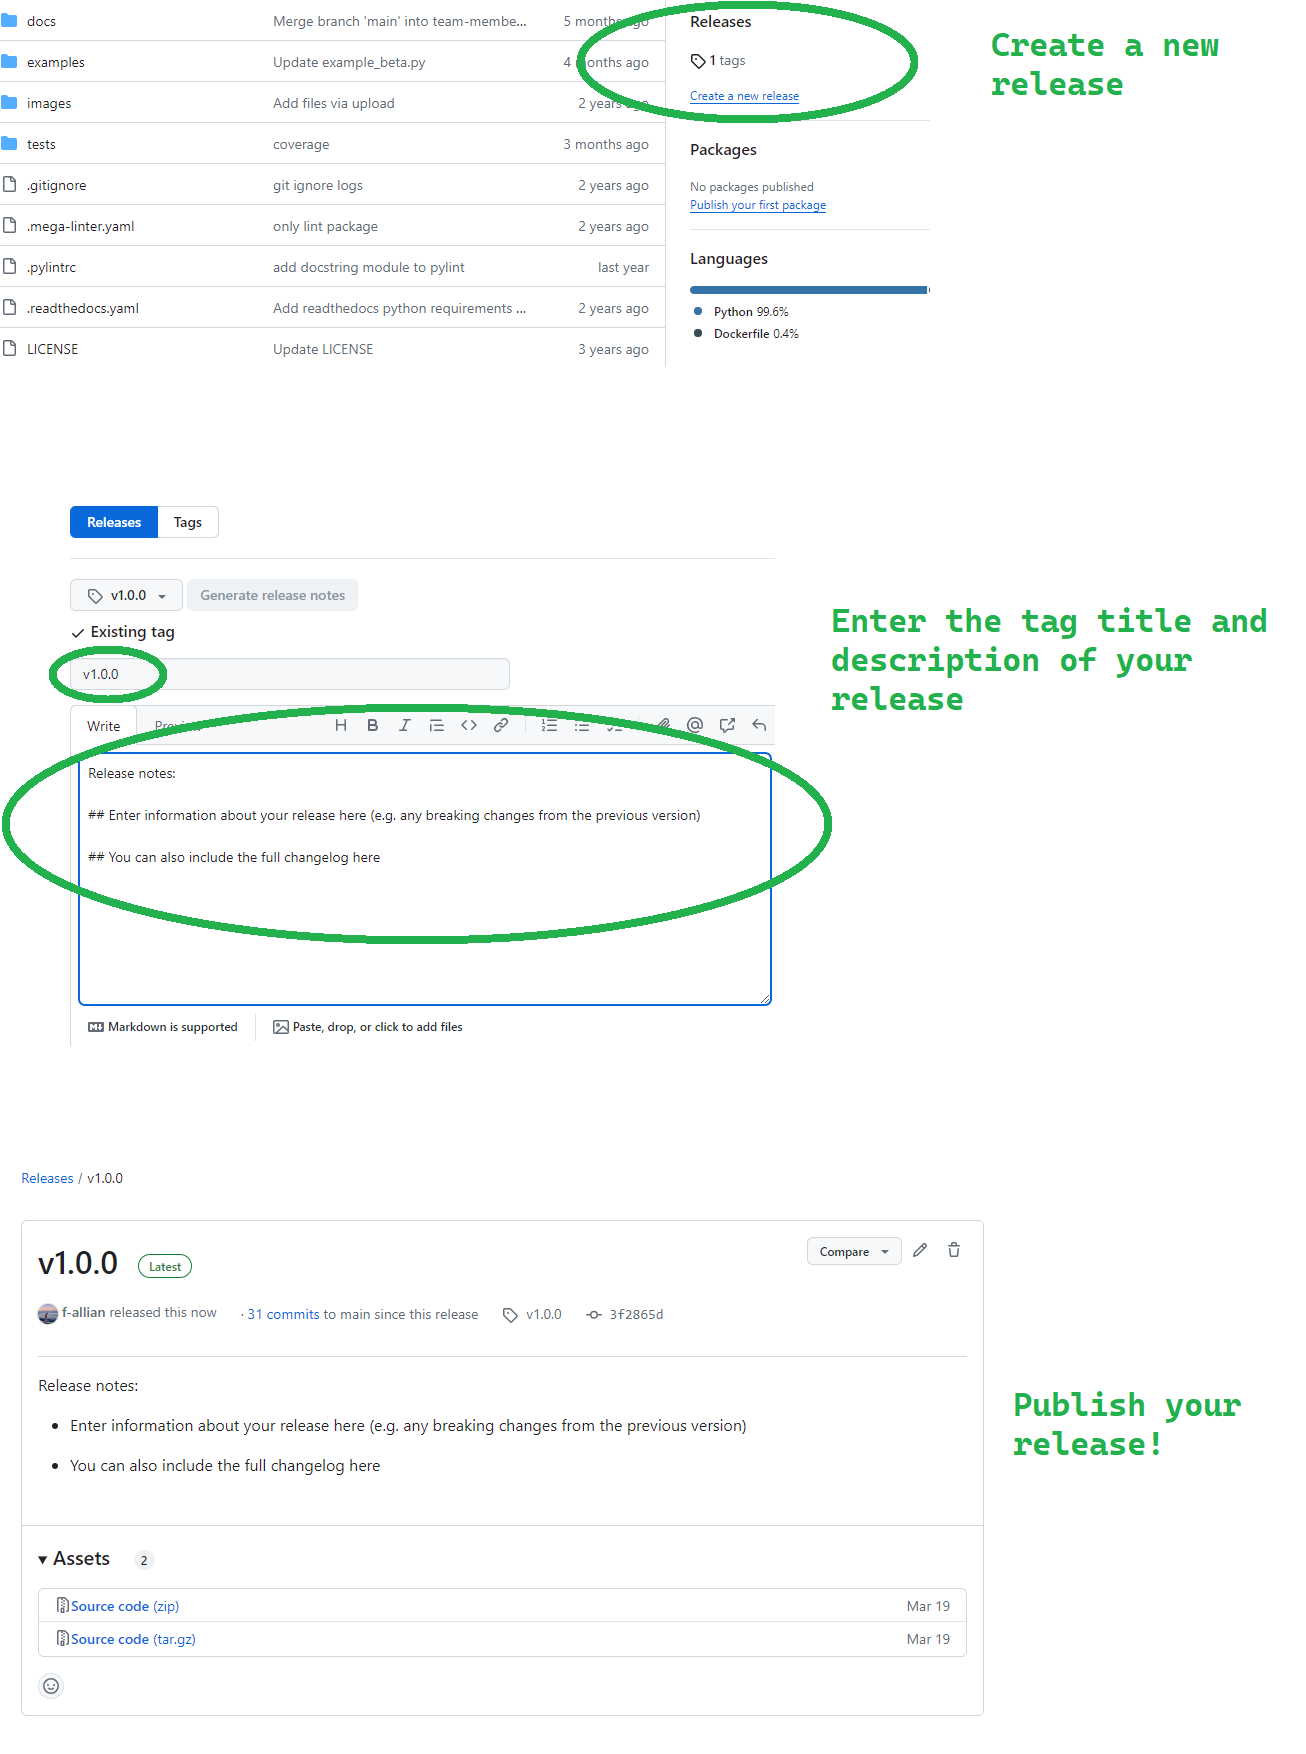
Manual Releasing using Git Tags
On GitHub, it is a relatively simple process to create a release of
your software by using Git tags. Git tags are
a way of permanently tagging a specific point in your repository’s
history, which can be used to denote a version that is suitable for
others to use. A tag is an immutable reference to a commit (or series of
commits), making it simple to identify specific versions of a software,
and the tags are commonly identified in conjunction with the Semantic
Versioning framework (e.g. v1.0.0). For more information about how
GitHub uses tags for software releases, see releases.
In general, tagging a release is a 2 step process using Git:
Create a tag of a specific point in your software package’s history using the
git tagcommand that is denoted by a specific version, and upload it to your remote repository usinggit push.Based on your tag, create a release on GitHub of the relevant files in your repository (usually a zip or tar.gz file), which allows users to download the specific release of your software that corresponds to the time you created your tag.
Collectively, the 2 steps process would look something like:
Once you’ve pushed your tag, you can create a release with the tag you pushed to your remote repository by the following:
Deleting a Release
You can also delete a release if you make an error using the following commands:
The first line simply deletes the tag v1.0.0 in your
local repository, whereas the second line deletes the
v1.0.0 tag from the remote repository named origin. Note
that the colon indicates that you are not pushing any new content to
replace the tag; instead, you are specifying that the tag should be
deleted. Once you have ran the lines above, you will receive
confirmation that the tag has been deleted.
Challenge 1: Should you always delete a release?
Why might it not be advisable to delete a tag or release, and what alternative actions could you consider instead?
Think about the impact of deleting a tag or release in version control. How might you preserve historical data while managing updates to tags and releases?
Deleting a tag or release in a version control system can disrupt historical tracking and cause confusion for current and future collaborators. Instead of outright deletion, consider tagging the correct commit with a new version number or marking the tag as deprecated with clear documentation. This maintains historical integrity while clarifying the correct state of the codebase. Additionally, communicating changes effectively with team members ensures everyone understands the correct usage of tags and releases for your project.
Automated Releases using Actions
Before wrapping up this section, it is important to highlight that you can also automate your releases on GitHub using Actions, saving you time and helping you release new versions of your package quickly. Since GitHub Actions is a CI/CD platform that allows developers to automate certain aspects of their workflows (such as builds, tests, deployments), we can also configure a release pipeline that is defined by a workflow file (in YAML format) that run whenever a change is made to your repository.
Recall that GitHub uses the .github directory to store
configuration files that are specific to GitHub features and
integrations, and keeps the repository organised by separating these
files from the main source code. Notice that it is common convention
that the .github folder is a hidden directory.
The .github/workflows directory is the designated place
where GitHub looks for workflow files. By placing your workflow files in
.github/workflows, you enable GitHub Actions to
automatically detect and run the workflows based on the triggers you
specify (such as a push, pull request, or tag creations).
As a reminder, here are some of the common variables used in GitHub Actions workflow files:
| Variable | Description |
|---|---|
name |
Specifies the name of the workflow. It helps identify the workflow in the GitHub Actions UI and in logs. |
on |
Defines the event that triggers the workflow, such as
push, pull_request, schedule, or
custom events like workflow_dispatch. |
jobs |
Contains one or more jobs to be executed in parallel or sequentially. Each job represents a set of steps that run on the same runner. |
runs-on |
Specifies the type of machine or virtual environment where jobs will
run, such as ubuntu-latest, windows-latest, or
macos-latest. |
steps |
Defines the sequence of tasks to be executed within a job. Each step
can be a shell command, an action, or a series of commands separated by
newlines (run). |
env |
Sets environment variables that will be available to all steps in a job. |
with |
Specifies inputs or parameters for an action or a specific step. |
uses |
Specifies the action to be used in a step. It can refer to an action in a public repository, a published Docker container, or a specific path in the repository. |
id |
Specifies a unique identifier for a step or action output, which can
be referenced in subsequent steps or actions
(outputs). |
secrets |
Allows access to encrypted secrets, such as
GITHUB_TOKEN, which is automatically generated and scoped
to the repository, used for authenticating GitHub API requests. |
There are several workflow extensions already present on GitHub that you can use in your configuration file to automate your releases (e.g. action-gh-release). An example workflow file to automatically trigger a new release based on a push could look something like:
YAML
name: Create Release

on:
  push:
    tags:
      - 'v*'  # Trigger on tags starting with 'v'

permissions:
  contents: write  # Ensure write permissions for the workflow

jobs:
  release:
    name: Create GitHub Release
    runs-on: ubuntu-latest
    steps:
      - name: Checkout code
        uses: actions/checkout@v2  # Checkout the repository's code

      - name: Create Release
        uses: softprops/action-gh-release@v1
        env:
          GITHUB_TOKEN: ${{ secrets.GITHUB_TOKEN }}  # Pass GitHub token to the action
        with:
          tag_name: ${{ github.ref }}  # The full tag name, e.g., refs/tags/v1.0.0
          release_name: Release ${{ github.ref }}  # Release name based on the tag
Let’s break down what is happening in the above workflow file.
The first logic
on.push.tags - 'v*'ensures the workflow triggers only when a tag starting with v is pushed, which is in line with the Semantic Versioning framework. Following this, we ensure that the workflow has the relevant write permissions to execute the workflow.Next, after initiating the operating system environment (
ubuntu-latest) there are 2 separate steps within the job that are carried out: first,Checkout codeuses theactions/checkout@v2action to fetch the repository’s code into the workflow environment. Second,Create Releaseuses thesoftprops/action-gh-release@v1action to automate the creation of a GitHub release. TheGITHUB_TOKENenvironment variable, securely provided through GitHub secrets (${{ secrets.GITHUB_TOKEN }}), allows the action to perform repository operations like creating releases. The action is configured with inputs such astag_nameandrelease_name, derived dynamically from the Git tag (${{ github.ref }}), ensuring each release is appropriately named and described (body: Automated release created by GitHub Actions.).
Ultimately, a workflow like this streamlines the process of managing
releases by automating tasks that would otherwise require manual
intervention as we have demonstrated above. Once you have created a file
similar to the one above, you can view the status of the workflow in the
Actions tab as usual.
Challenge 2: Automating Releases
You have been tasked with setting up a GitHub Actions workflow to
automate the release process whenever a tag is pushed to your
repository. Despite configuring the workflow correctly
(on: push: tags: - 'v*'), you notice that the release is
not being created. Provide a systematic approach to troubleshoot and
resolve this issue.
Does GitHub provide a way to view the output logs for a given workflow?
There are several different approaches to debug this workflow. The
first place to check would be the output log files from the workflow for
any errors or warnings related to event triggers - this will give you a
good idea where in your file the error may be arising. Since the error
in question is likely due to the push itself, the most obvious line to
check is on: push: tags: - 'v*' to ensure it correctly
triggers on tag pushes starting with v, and ensure Semantic
Versioning practices are being followed, and that there are no
typographical errors. The second most common fault is that the GitHub
token (secrets.GITHUB_TOKEN) used in your workflow has been
incorrectly inputted, and/or may have insufficient permissions
(permissions: contents: write) to create releases and
perform other necessary actions in your repository.
Remember to never publish any sensitive information, such as passwords, directly on GitHub. Storing sensitive data in your repository makes it publicly accessible (if your repository is public) or easily accessible to anyone with repository access (if private). This can lead to unauthorised access, security breaches, and potential misuse of your code. Instead, use should use GitHub Secrets or environment variables to securely manage the sensitive information, ensuring it is kept safe and only accessible by authorised collaborators or workflows.
GitHub tags provide a way to manage specific software versions via releases, enabling developers to easily reference and distribute stable versions of their software for their users.
Releases allow your software to be quickly and easily installed across different systems.
Content from Publishing Packages
Last updated on 2026-07-14 | Edit this page
Estimated time: 12 minutes
Overview
Questions
How can GitHub’s automation tools help with publishing your software?
What are the benefits of publishing your software on PyPI and ORDA?
Objectives
- Learn how to publish your software to PyPI and The University of Sheffield’s ORDA repository.
Publishing your Software
Python Packaging Index
Now that we have covered how to release specific versions of your
software, we will turn to how to publish your package on an online
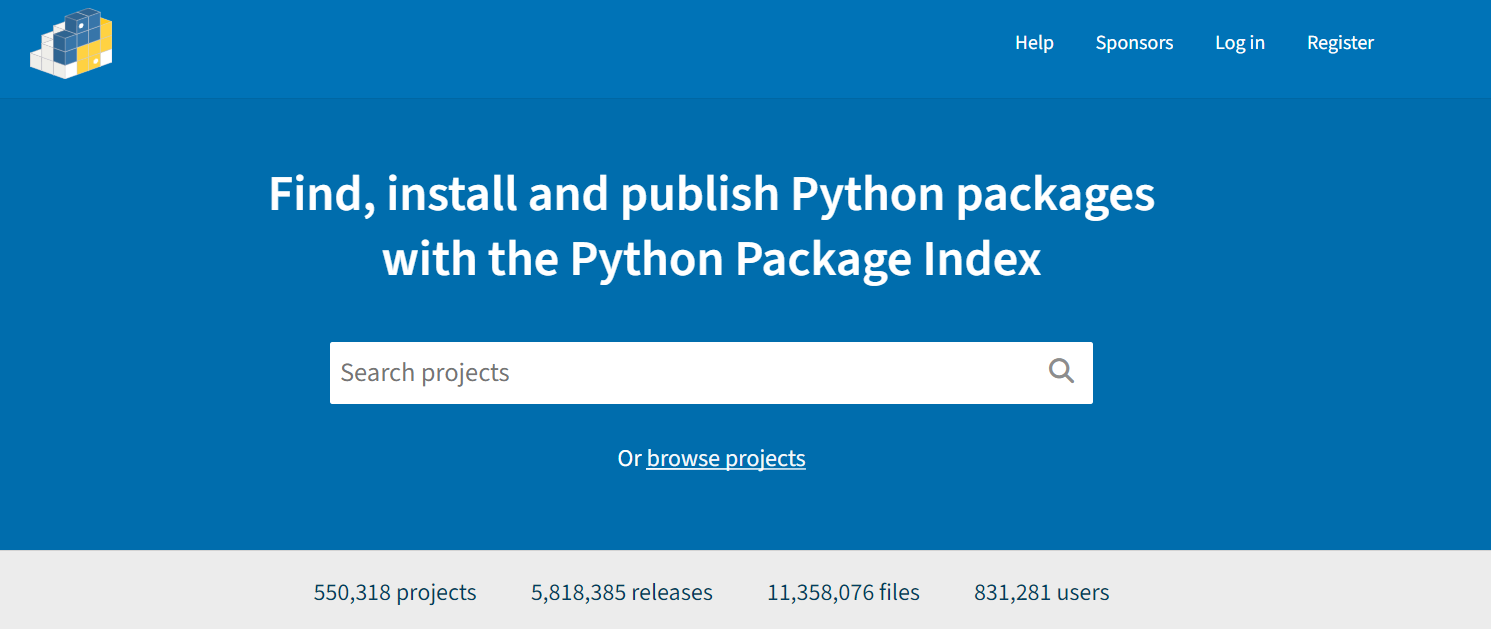
repository that allows others to easily install and use you software. PyPI (or the Python Packaging Index) is the
official package repository for the Python community. It serves as the
central location where developers can publish and share their packages,
making them easily accessible to the wider community. When we use
pip to install packages from the command line, it fetches
them from PyPI by default. Uploading your packages to PyPI is
recommended if you want to distribute your projects widely, as it allows
other developers to easily find, install, and use your software.
Developers often use TestPyPI for testing and validating packages before they are officially published on PyPI.
To build the wheels, there are 2 tools that we need to install and
use. The first is build, which is a command-line tool used
to build source distributions, and wheel distributions of Python
projects based on the metadata specified in the
pyproject.toml. On the other hand, twine is
the tool we use to securely upload the built distributions to PyPI,
which handles tasks like authentication and transfer of package
files.
In practice, the installation and usage of these tools would look something like:
This will create dist/your-project-name-1.0.0.tar.gz
(source distribution) and
dist/your-project-name-1.0.0-py3-none-any.whl (wheel
distribution) in the dist directory. Next, we can use twine
to securely upload the built distributions to PyPI:
We can also run:
BASH
# Check our files is ready to be uploaded using twine check

twine check dist/*

# Check our package is ready to be uploaded to TestPyPI

twine upload --repository testpypi dist/*
Once we have confirmed that everything works as expected on TestPyPI, we may proceed with installing our package to PyPI:
Finally, once our package is available on PyPI this means that other users can install the package using the command:
Automating Publishing to PyPI
Challenge 1: Automate Publishing to testPyPI
Automate releasing
There are several pre-exisiting GitHub Actions that you could use, for example: gh-action-pypi-publish
Create a workflow file in .github/workflows/ called
release-to-pypi.yml with the following content:
YAML
name: Publish Python distribution to TestPyPI

on:
  push:
    tags:
      - 'v*'

jobs:
  build:
    name: Build distribution 📦
    runs-on: ubuntu-latest

    steps:
    - uses: actions/checkout@v4
      with:
        fetch-depth: 0
        persist-credentials: false
    - name: Set up Python
      uses: actions/setup-python@v5
      with:
        python-version: "3.x"

    - name: Install pypa/build
      run: >-
        python3 -m
        pip install
        build
        --user
    - name: Install build dependencies
      run: python3 -m pip install build setuptools setuptools_scm
    - name: Build a binary wheel and a source tarball
      run: python3 -m build
    - name: Store the distribution packages
      uses: actions/upload-artifact@v4
      with:
        name: python-package-distributions
        path: dist/

  publish-to-testpypi:
    name: Publish Python 🐍 distribution 📦 to TestPyPI
    needs:
    - build
    runs-on: ubuntu-latest

    environment:
      name: testpypi
      url: https://test.pypi.org/p/<package-name>

    permissions:
      id-token: write  # IMPORTANT: mandatory for trusted publishing

    steps:
    - name: Download all the dists
      uses: actions/download-artifact@v4
      with:
        name: python-package-distributions
        path: dist/
    - name: Publish distribution 📦 to TestPyPI
      uses: pypa/gh-action-pypi-publish@release/v1
      with:
        repository-url: https://test.pypi.org/legacy/
The above instructions triggers a GitHub Actions workflow that automatically publishes a Python package to Test PyPI whenever a new tag starting with “v” is pushed to the repository.
This method makes use of the latest recommended authenticated method called Trusted Publishers. Trusted Publishers is a security enhancement for automating the publishing of Python packages to PyPI, particularly from continuous integration systems like GitHub Action. Instead of relying on long-lived API tokens, Trusted Publishers uses the OpenID Connect (OIDC) authentication protocol to authenticate and authorise CI/CD workflows, which creates a secure and token-less method for package uploads. When a trusted workflow runs, it generates short-lived OIDC tokens that PyPI verifies, and ensures that only authorised workflows from a specific repository or organisation can publish. Although this method is out the scope of this episode, we recommend you to read about the Trusted Publishers approach, and consider its advantages and disadvantages before applying it to your workflows.
Publishing to ORDA

At The University of Sheffield, researchers also use another popular
repository called ORDA.
ORDA is the University’s main research data repository, facilitating the
sharing, discovery, and preservation of the university’s research data.
Managed by the University Library’s Research Data Management team and
provided by Figshare, ORDA assigns a DOI (Digital Object Identifier) to
each deposited record, ensuring its accessibility and citability.
Researchers are encouraged to use ORDA unless a subject-specific
repository or data center is more commonly used in their field. ORDA
supports the FAIR principles, and by extension the FAIR4RS principles,
by making research outputs citable, discoverable, and easily accessible
to a wider research community. As with PyPI, you should first sign up to
ORDA (note; you should use your university credentials to create your
account).
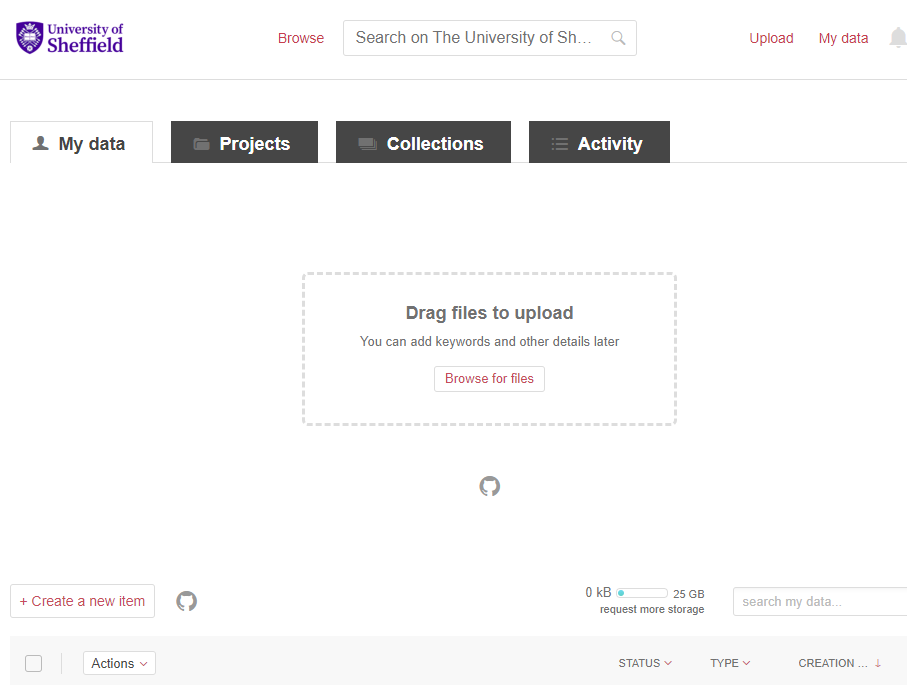
Figure 4 demonstrates how to upload your project to ORDA using their graphical user interface functionality. There is also the option to connect your project’s GitHub account to ORDA, allowing further portability between the two platforms. Once you have published your software on ORDA, it is readily available for other researchers to use and cite in their own research.
Challenge 2: DOI and Reproducibility
In a research context, why is it important to cite software releases via a DOI for example, alongside academic papers?
Citing software releases via a DOI alongside academic papers in research is crucial for several reasons. Firstly, it enhances reproducibility by providing clear references to the specific versions of software used in research. This allows other researchers to replicate and verify findings, ensuring the reliability of published results. Secondly, it promotes transparency by documenting the tools and methods used in studies, which is essential for research validation and building upon existing work. Also, citing software releases acknowledges the contributions of software developers and teams, ensuring they receive proper credit for their work, much like authors of academic papers.
Another useful integration feature ORDA enables is the use of their API, which allows developers to further automate their software publishing. As with the example above using PyPI, we can also use GitHub to create a CI/CD workflow that triggers a release to ORDA once we have officially published a release of our software. An example file for this workflow could look something like:
YAML
name: Upload to ORDA
on:
  release:
    types: [published]

jobs:
  upload:
    runs-on: ubuntu-latest
    steps:
      - name: Prepare Data Folder
        run: mkdir 'data'

      - name: Download Archive
        run: |
          curl -sL "${{ github.event.release.zipball_url }}" > "${{ github.event.repository.name }}-${{ github.event.release.tag_name }}.zip"
          curl -sL "${{ github.event.release.tarball_url }}" > "${{ github.event.repository.name }}-${{ github.event.release.tag_name }}.tar.gz"

      - name: Move Archive
        run: |
          mv "${{ github.event.repository.name }}-${{ github.event.release.tag_name }}.zip" data/
          mv "${{ github.event.repository.name }}-${{ github.event.release.tag_name }}.tar.gz" data/

      - name: Upload to Figshare
        uses: figshare/github-upload-action@v1.1
        with:
          FIGSHARE_TOKEN: ${{ secrets.FIGSHARE_TOKEN }}
          FIGSHARE_ENDPOINT: 'https://api.figshare.com/v2'
          FIGSHARE_ARTICLE_ID: YOUR_ID_NUMBER
          DATA_DIR: 'data'
The file above is tailored for uploading data to ORDA upon triggering
by a published release event. It begins by preparing a data folder,
downloading the archive associated with the release tag, moving the
downloaded files to the data directory, and finally using the
figshare/github-upload-action integration to upload the
data to ORDA using the specified token, endpoint, article ID, and data
directory. Note, you can create your own personal Figshare token in your
account settings. Importantly, remember that as with the PyPI username
and password, your Figshare token is sensitive and must be passed in as
a secret or environment variable.
Finally, once you have uploaded your file sources to ORDA, your software will be readily available for other researchers to use, allowing significant progress towards building a transparent and reproducible research software environment for all involved.
You can easily publish your package on PyPI for the wider Python community, allowing your users to simply install your software using
pip install.The University of Sheffield’s ORDA repository is another valuable platform to upload your software, further enabling software reproducibility, transparency, and research impact for all project collaborators involved.